Setup
Here you can find how you can setup various parts that works together as a single enclosure. You can even setup multiple enclosures. But make sure that relays and areas are not shared in multiple enclosures or areas.
A simple rule to remember:
A relay can only be used once.
Login
 After the installation, you need to setup TerrariumPI. In order to do that, login with a browser at http://[raspberry_pi]:8090 and click on the
 Login link on the left side menu. The default login should be admin / password (FAQ)
Help
On every form popup you have a small question mark next to the form title. Click on it to get more information about the form fields.
Required fields
All fields with a red star (* ) are required to fill out. Some fields can be come required based on selected options.
Settings
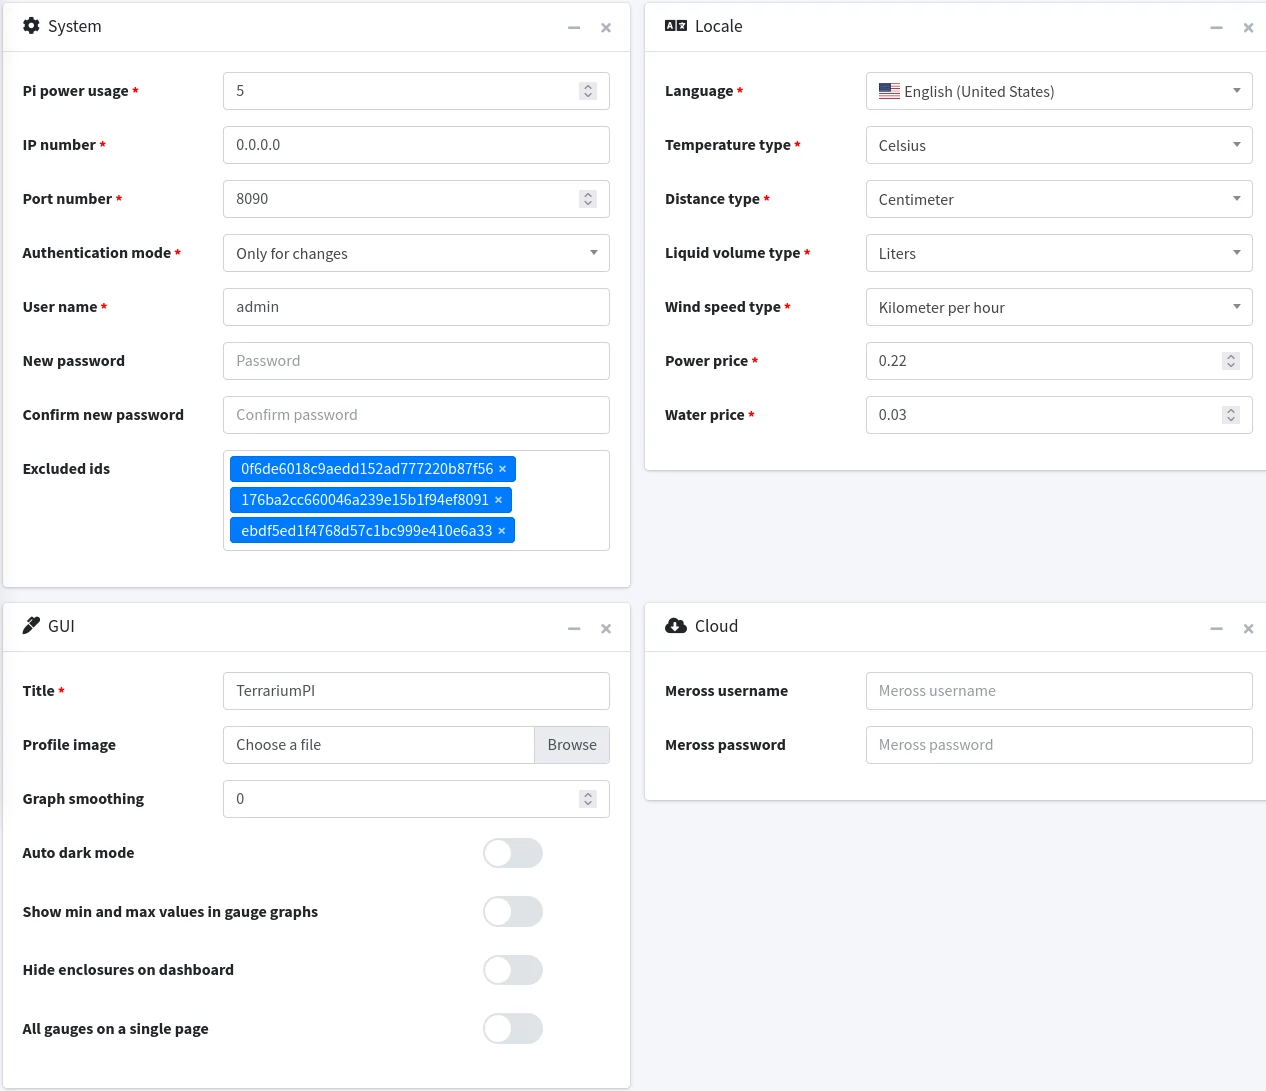 Settings form with four parts
The settings is split up in multiple parts. Each group contains settings that are related to each other.
System
In the system group you setup the minimal settings to get TerrariumPI running.
- Pi power usage *
Enter the amount of total power in watts used by the Raspberry PI including attached USB devices.
- IP number *
Enter the IP to listen for connections. Default 0.0.0.0
- Port number *
Enter the port number to listen for connections. Default 8090
- Authentication mode *
There are 3 authentication options.
- Full authentication: For all actions you need to be logged in.
- Only for changes: Only adding and updating needs authentication.
- No authentication: No authentication at all. Be very careful with this!
- User name *
Enter the user name for authentication. Default admin
- New password
- Enter a new password for authentication. Encrypted
- Confirm new password
- Confirm the new password for authentication.
- Excluded ids
- List of IDs that are excluded. If you mis a sensor or relay, remove it from this list, and it will be used again.
Locale
In the locale group you can setup your locales that are custom to.
- Language *
Select the interface language. This will also change number and currency formatting.
- Temperature type *
Select the temperature indicator. Only affects the current values.
- Distance type *
Select the distance indicator. Only affects the current values.
- Liquid volume type *
Select the water volume indicator. Only affects the current values.
- Wind speed type *
Select the wind speed indicator. Only affects the current values.
- Power price *
Enter the price per kWh.
- Water price *
Enter the price per L/Gallon.
Gui
In the Gui group you can tune the web interface.
- Title *
Enter a custom title. If it contains the letters PI, it will turn red on the MOTD
- Profile image
- Upload a small image. That is used in the left menu.
- Graph smoothing
- If the graph is spiky, you can enter a value which is the amount of measurements that are averaged.
- Auto dark mode
- Tun dark mode on based on weather sun rise and set
- Show min and max values in gauge graphs
- Add the minimum and maximum value that is measured in the last 24 hours on the gauge graph.
- Hide enclosures on dashboard
- Only show the average graphs on the dashboard.
- All gauges on a single page
- Add an extra menu option to show all the sensors on a single page.
Cloud
In the cloud group you can enter credentials for different cloud integrations
Meross
With the Meross cloud you can use all the relays and sensors that are connected to your account.
- Meross username
- The username to login to your Meross cloud account. Encrypted
- Meross password
- The password to login to your Meross cloud account. Encrypted
Unsplash
With Unsplash you can get a nice image background in the web GUI.
- Unsplash access key
- This is the access key of your application at Unsplash. Encrypted
- Unsplash key words
- Here you can enter key words to use for picking a random background image.
Weather
 Popup form adding/updating the weather source
With the weather data you can schedule your light system based on the sun rise and sun set. This can either be at your home location, or any other location. And the historical weather data is used for climate mirroring.
Timezones
The weather data is loaded in such a way that timezones are ‘ignored’. So when it is day at 08:00 at the given location, TerrariumPI will thread that as 08:00 local time. Even when the location is at the other side of the world.
This way, you can have seasons with shorter and longer days, based on day of the year.
Sources
TerrariumPI can handle two weather sources at the moment. Those are:
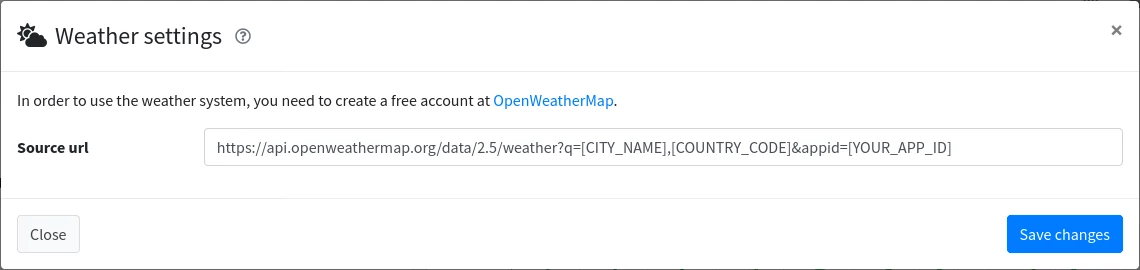
OpenWeatherMap.org
![]() In order to use the weather system with Openweathermap.org, you need to create a free account at OpenWeatherMap.
In order to use the weather system with Openweathermap.org, you need to create a free account at OpenWeatherMap.
Than use one of the two supported API urls:
https://api.openweathermap.org/data/2.5/weather?q=[City],[Country]&appid=[API_KEY]
or
https://api.openweathermap.org/data/2.5/weather?id=[CityID]&appid=[API_KEY]
Do not add the &metric= part in the url. And keep the value of 2.5 in the url!
TerrariumPI will auto detect with API version you have an account for. TerrariumPI should stay within the free 1000 API calls per day.
important This OpenWeatherMap url will be encrypted in the database. So the API_KEY value cannot be read out of the database directly.
API Change
As from October 2022 they changed the conditions to a free account. Which means that we have fewer data to work with. This also means no history data for climate mirroring out of the box.
If you have created an account before that date, you should still be able to use the One call API 2.5 which does hold all the needed information. With One call API 3.0, you need an extra (free) subscription which needs credit card data.
For everybody that is registered with OpenWeatherMap after October, will have less data or you have to subscribe for the One call API 3.0
TerrariumPI will self test which API version you have. It will first test for version 3.0 and if that fails, it will fallback to the (old free) 2.5 version. So the API url for TerrariumPI is always as described below including the 2.5 in the url!
Open-Meteo.org
 This is a free service which does not need an account. You need to know the latitude and longitude of your location. And than construct the following url below:
https://api.open-meteo.com/v1/forecast?latitude=[LAT]&longitude=[LONG]
That is all, and you have all the weather data that is required.
Relays
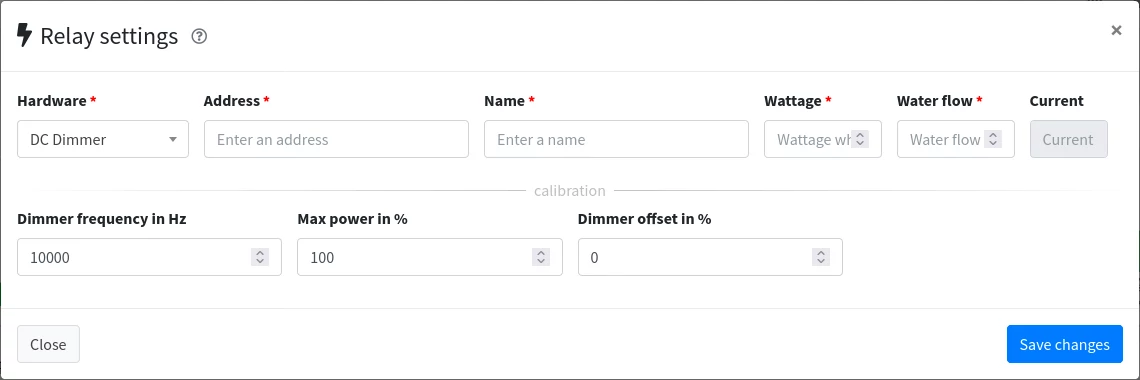 Popup form for adding and updating relays - Calibration is only available for dimmers Adding and changing relays is done with the above relay form.
- Hardware *
The hardware type of the relay. A full list of supported relays
- Address *
Enter the address of the relay. This is specific for each relay.
- Name *
The name of the relay. Use an easy to remember name.
- Wattage *
The amount of power that is used when on or at full power (dimmer)
- Water flow *
The amount of water that is used when on or at full power (dimmer) in Liter/Gallon per minute
- Current
- The current state of the relay. Value 0 is off, 100 is full on, or a value between 0 - 100 (dimmer)
Calibration
This is only available for dimmers.
- Dimmer frequency in Hz
- The frequency of witch the dimmer is working on. The default depends on the selected dimmer type.
- Max power in %
- The max power the dimmer is allowed to use. Default 100
- Dimmer offset in %
- An offset value that is reduced from the actual value. Default 0
- Dimmer max dim
- Legacy dimming like TP3. Enter the technical max dim value. When this value is greater then 0, then the dimmer will use the RPI PWM hardware for dimming. This only works on GPIO pin 12, 32, 33 and 35
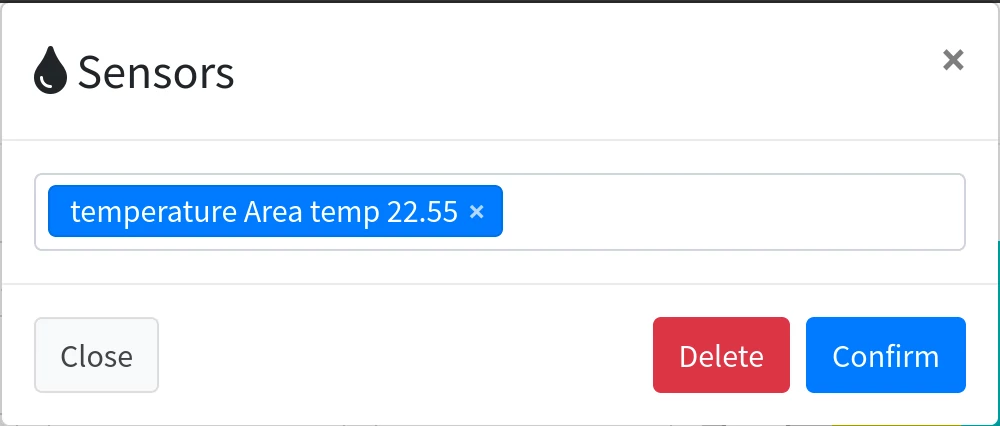
Sensors
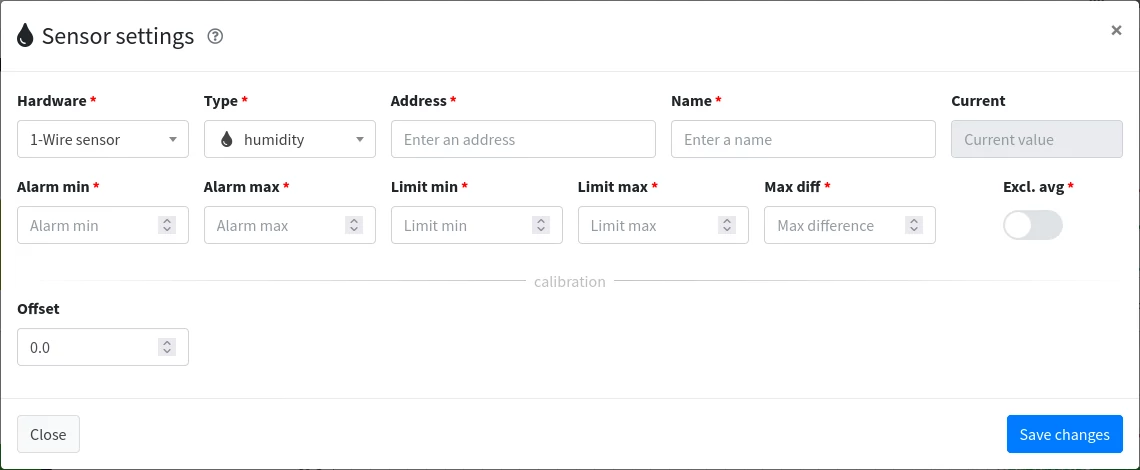 Popup form adding/updating the sensors Adding and changing sensors is done with the above sensor form.
- Hardware *
The hardware type of the sensor. A full list of supported sensors
- Type *
Select what kind of sensor it is.
- Address *
Enter the address of the sensor. This is specific for each sensor.
- Name *
The name of the sensor. Use an easy to remember name.
- Alarm min *
The lower alarm value. When the sensor gets below this value, the low alarm will be triggered
- Alarm max *
The high alarm value. When the sensor gets higher then this value, the hight alarm will be triggered
- Limit min *
The minimum value that is valid for this sensor. Values measured below this value will be ignored.
- Limit max *
The maximum value that is valid for this sensor. Values measured higher then this value will be ignored.
- Max diff *
The maximum difference between two measurements that is valid. Enter 0 to disable.
- Exclude average *
Exclude this sensor from the average calculation and graphs on the dashboard.
Calibration
- Offset
- Enter a value to correct the output reading. This can be a positive or negative value.
- Minimum moist value
- Only available for Chirp sensors. More information at Chirp sensor
- Maximum moist value
- Only available for Chirp sensors. More information at Chirp sensor
Doors / buttons
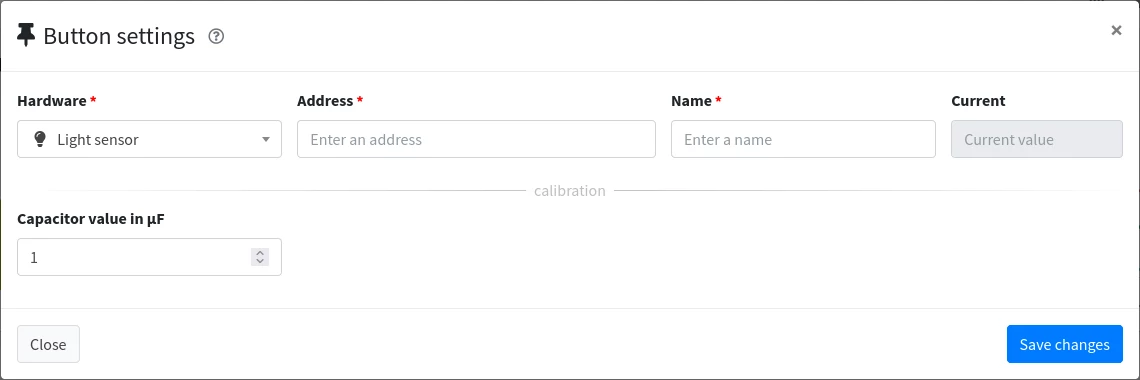 Popup form for adding and updating buttons - Calibration is only available for light sensors Adding and changing buttons is done with the above button form.
- Hardware *
The hardware type of the button. A full list of supported buttons
- Address *
Enter the address of the button. This is specific for each button.
- Name *
The name of the button. Use an easy to remember name.
- Current
- The current state of the button. Value 1 is active, value 0 is not active
Calibration
This is only available for light sensors.
- Capacitor value in µF
- Enter the value of the capacitor
Webcams
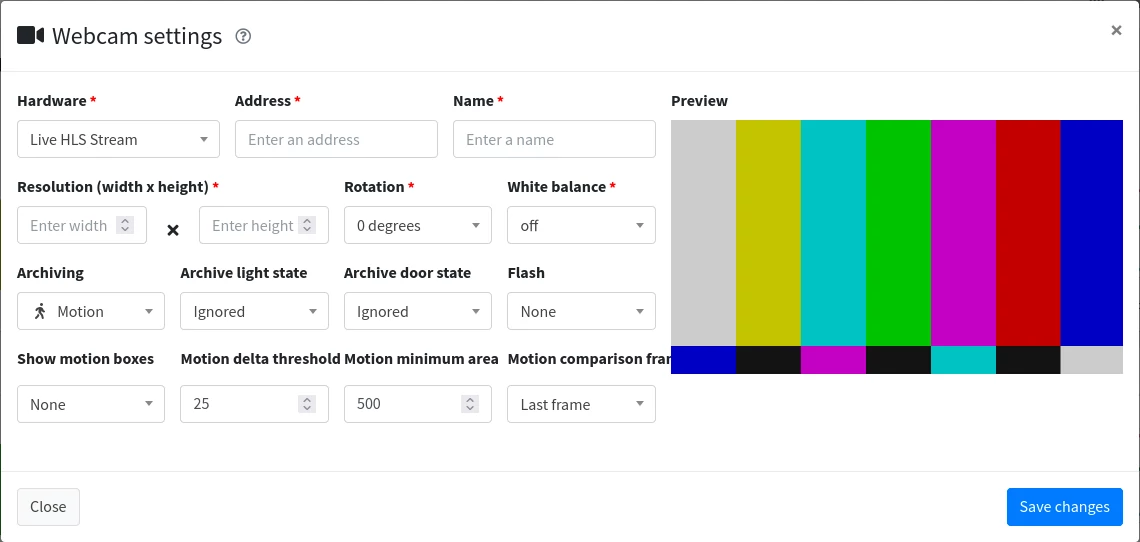 Popup form for adding and updating webcams
Adding and changing webcams is done with the above button form.
- Hardware *
The hardware type of the webcam. A full list of supported webcams
- Address *
Enter the address of the webcam. This is specific for each webcam.
- Name *
The name of the webcam. Use an easy to remember name.
- Resolution *
Enter the maximum resolution of the webcam in width x height pixels.
- Rotation *
Select the rotation of the webcam.
- White balance *
Select the white balance correction option.
- Archiving
- Select the archiving type. This can either be motion or time based.
- Archive light state
- Select the state of the lights for making archive images. In order to use this, make sure this webcam is selected at the correct enclosure
- Archive door state
- Select the state of the doors for making archive images. In order to use this, make sure this webcam is selected at the correct enclosure
- Flash
- Select relays that act as a flasher. When updating the webcam image, these relays will be toggled on just before taking a picture.
Motion detection
This is only available when motion is selected at Archiving.
- Show motion boxes
- Show the area where the motion took place.
- Motion delta threshold
- How much change is needed in order to detect motion. Default value of 25 works well
- Motion minimum area
- The amount of square pixels to look in to detect motion. Default value of 500 works well.
- Motion comparison frame
- Select which frame to use for motion detection. Either the latest updated image (last frame), or the latest archived image (when there was motion).
Markers
 It is possible to add markers on the webcam image to show realtime sensor information. Click on the
  icon in the preview window to drop a marker and select the sensors you want to show.
In order to update or delete an existing marker, double click the marker.
Playlists
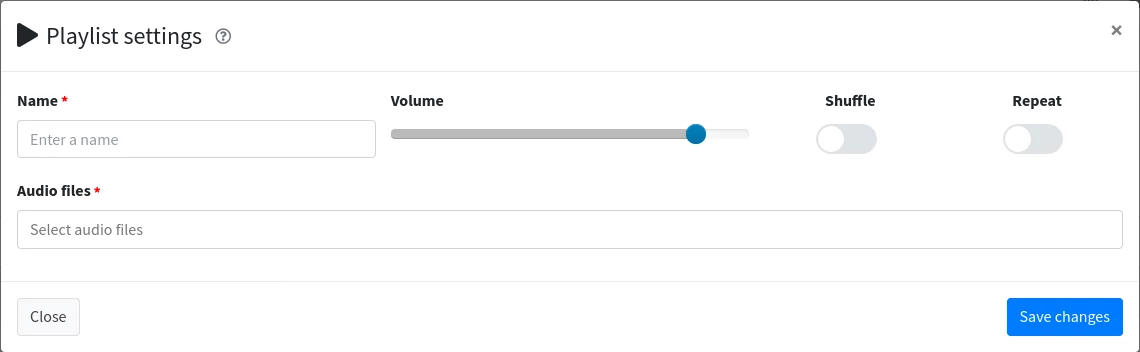 Popup form for adding and updating playlists Adding and changing playlists is done with the above button form.
- Name *
The name of the playlist. Use an easy to remember name.
- Volume
- The volume of the complete playlist.
- Shuffle
- Shuffle the playlist every time it is (re)started.
- Repeat
- Repeat the playlist. If shuffle is enabled, it will be shuffled every repeat action.
- Audio files *
List of audio files. The order of adding is order or playing.
Enclosures
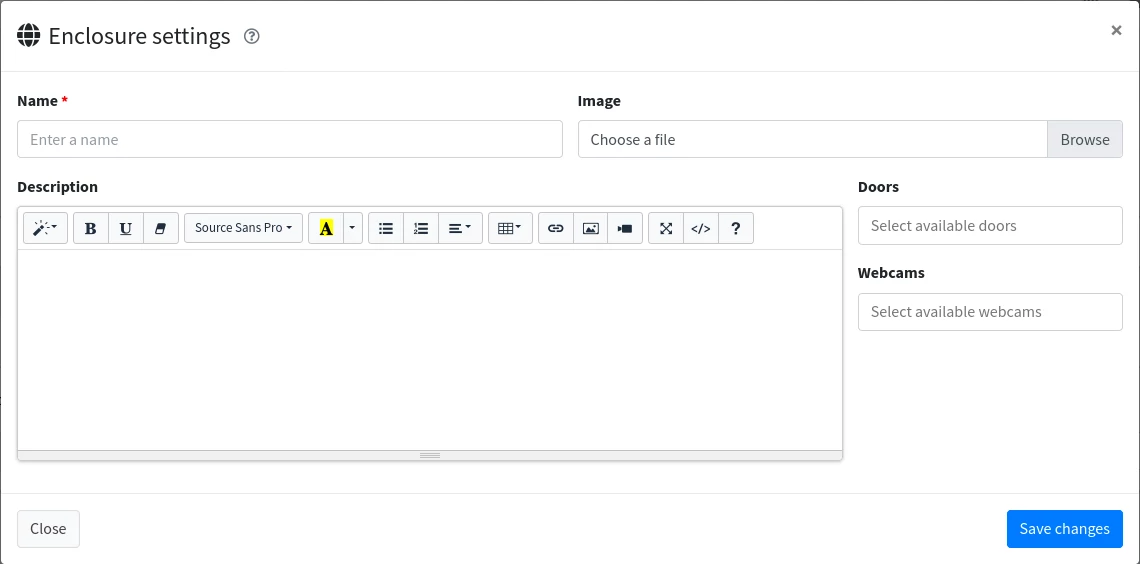 Popup form for adding and updating enclosures Adding and changing enclosures is done with the above button form.
- Name *
The name of the enclosure. Use an easy to remember name.
- Image
- An image that is used for background image on the dashboard.
- Description
- A free field where you can enter some information about your animals/plants. You can even add images here.
- Doors
- The door sensors that are used for this enclosure. Magnetic sensors.
- Webcams
- One or more webcams that are used in this enclosure. Webcams selected here can use the
archive light stateandarchive door stateoption at the webcam settings.
Areas
Adding and changing areas is done here. But as areas have a but more functionality, they are discussed per area type. The most important is that there is an area configured as main lights as this will influence the timing of other areas if they depend on the timing of the main lights. Without this, the system will not work.
Also make sure that the light area has relays configured at the Day settings tab.
Depending on the combination of Type and Mode some fields are disabled and not used. The values that are shown will be ignored during the operating of the software.
Three fields are always required and shared in all the area types:
- Enclosure *
Select the enclosure to which this area belongs.
- Type *
Select the type of area. Depending on the type, new/different options are available.
- Name *
The name of the area. Use an easy to remember name.
Main Lights
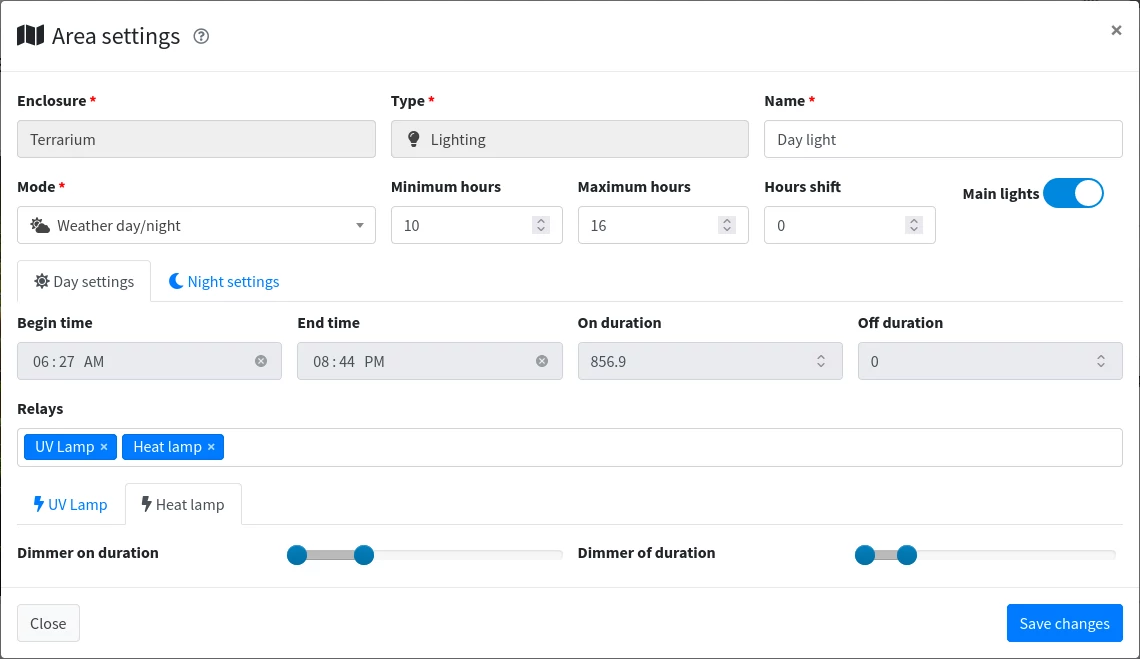 Popup form for adding and updating areas
- Mode *
Select the operating mode of this area. Use timer for custom on and off times. Weather is using your configured weather data
- Minimum hours
- Enter the minimum hours that the lights should be on. If the day based on the weather data is shorter, the lights will stay on for at least this amount of time.
- Maximum hours
- Enter the maximum hours that the lights should be on. Reverse of minimum hours.
- Hours shift
- Shift the time that the lights should go on based on the weather sun rise. Can be a positive or negative decimal value (ex: -1.3)
- Main lights
- Toggle this if the lights are the main lights on the enclosure. This is used for other areas that depend on this light area. Make sure at least one light area has the toggle main lights set
Then you need to setup at least the Day settings tab else the software will not work. Do not use the same relay in the day and night settings. That does not work. A relay configured in the day settings part, will be off during the night period.
In the day and night setting tab you can configure the following:
- Begin time
- Depending on the selected mode you can enter the start time when the relay(s) should go on.
- End time
- Depending on the selected mode you can enter the end time when the relay(s) should go off. The duration between begin and end time we call the
operating window - On duration
- Depending on the selected mode you can fine tune the time that the relay(s) should on in minutes time. Enter a value of 0 to put the relays on for the complete operating window time.
- Off duration
- Depending on the selected mode you can enter the amount of minutes the relay(s) should be off during the operating window. Enter 0 to disable.
Timer functionality: When you have an operating window of 10 hours, and selected 45 min on duration and 15 min off duration, you will get a that the relays will toggle on at the start, run for 45 minutes, and go off for 15 minutes. As this is in total 1 hour, this will be repeated 10 times during the operating window time.
- Relays
- Here you select the relay(s) that needs to be controlled. When you select a relay, depending on the type, you will get extra tabs where you can either set the on/off dimming duration or relay delay when the relay(s) are toggled on or off.
Simulate sun rise/set: When you select a dimmer and a normal relay, you could setup the dimmer to go on in 30 minutes, and delay the normal relay for 30 minutes, so that when the dimmer is at full power, the other light is toggled on. This will give a nice sun rise effect.
Other areas
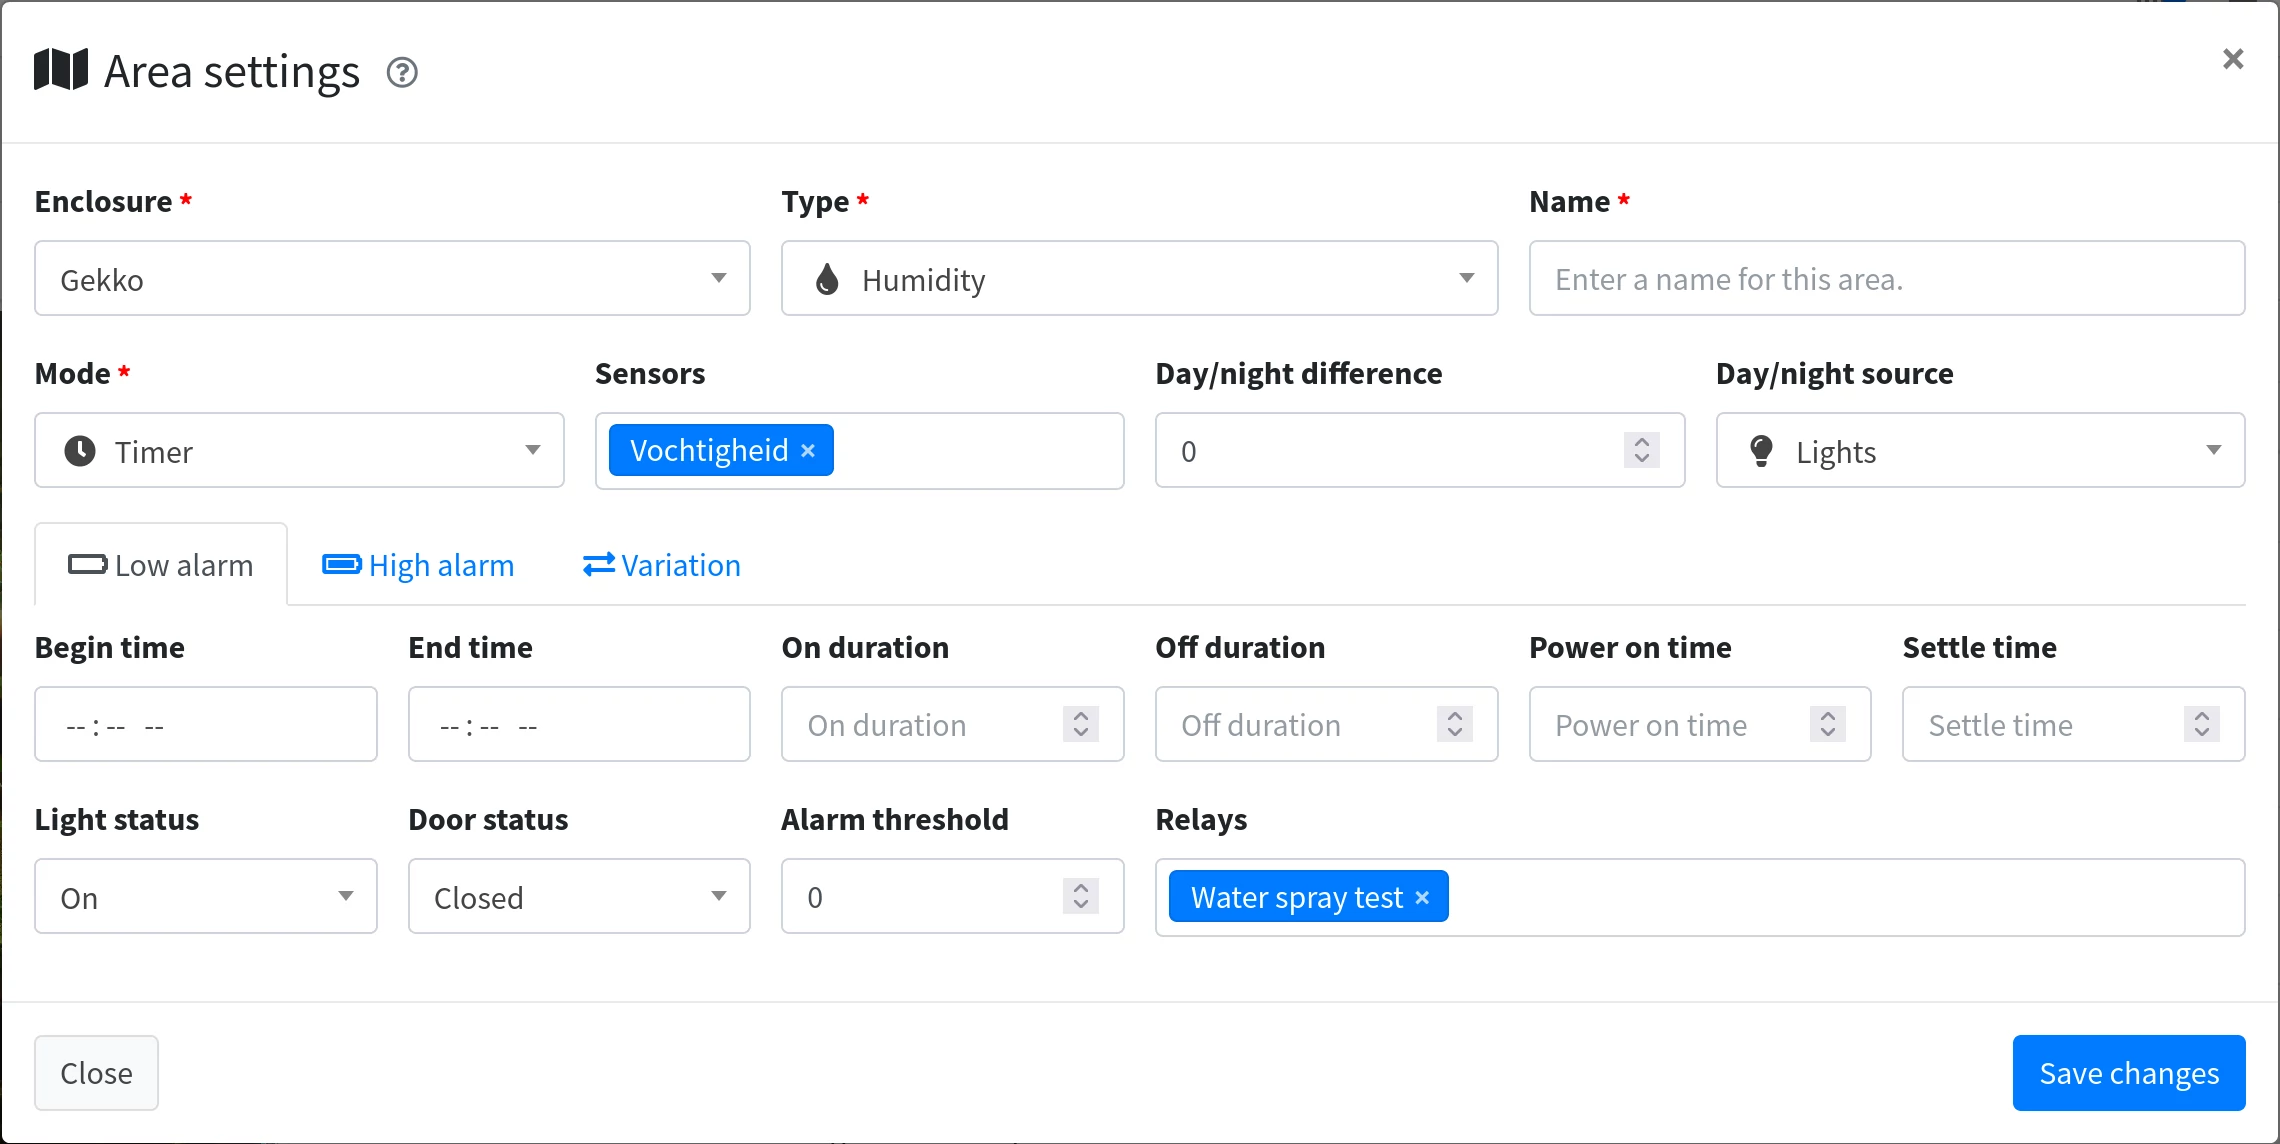
There are multiple types of areas that can be used. Almost all types have the same logic, but the type of area is of influence on the used sensors. In the screenshot below you see the Humidity type area. But for CO2, Conductivity, Cooling, Heating, Moisture, Fertility, PH this is all the same. Only audio and watertank are special areas which have their own setup.
The system uses the sensors alarm values to determine the right conditions you want. For example, using an area with a heater relay and temperature sensors will try to get the temperature in the middle of the minimum and maximum sensor values. Either by using a dimmer or by just toggling on and off. By changing the sensor alarm values, you can raise or lower the wanted temperature. This is the basic logic we use.
 Popup form for adding and updating areas
- Depends on
- Here you can select other areas on which this area depends on. If the depending area is in an alarm state, this area will not toggle on, or if already on, toggle off. For example you have a water tank area and a humidity area where you use a sprayer. When the water tank is (near) empty the low alarm of the water tank will go on, and this humidity area will then not toggle on. Protect against dry running the water sprayer.
- Mode *
- Sensors
- Select the sensors you want to use with this type of area. The area will use the average values of the current, min and max alarm values.
- Day/night difference
- Enter a value that the sensors should raise or lower when it become night. Enter a negative value for lowering the sensors. When it become day again, the sensor values will go the opposite direction and return to normal. Leave it 0 if you are planning to use the variation tab
- Day/night source
- Select the day and night source. This can either be the main lights or weather. This is used for light settings later on the day or night tabs.
Next you can configure either the Low alarm or High alarm tab. This is optional. When you do not select at least 1 relay in these tabs, you will only get a summary for that area with no actions. The Variation tab is described separately.
Make sure you do not select a relay more then once in these tabs and areas!
- Begin time
- Depending on the selected mode you can enter the start time when the relay(s) should go on.
- End time
- Depending on the selected mode you can enter the end time when the relay(s) should go off. The duration between begin and end time we call the
operating window - On duration
- Here you can fine tune the time that the relay(s) should on in minutes time. Enter a value of 0 to put the relays on for the complete operating window time.
- Off duration
- Here you can e enter the amount of minutes the relay(s) should be off during the operating window. Enter 0 to disable.
- Power on time
- Here you can even more fine tine the on duration. The value here is in seconds. When this value is higher then 0 the relay will on for this amount of seconds and will then toggle down.
- Settle time
- The time between two relay actions. This is a value in seconds. This means that when the relay goes off, it will wait this amount of time before it will toggle on again. This value is also affective between the
Low alarmandHigh alarm. - Light status
- Select the state of the lights. If the light state is not in the selected state here, the relays will not toggle and power down. This depends on the option Day/night source you have selected earlier.
- Door status
- Select the state of the doors. If the door state is not in the selected state here, the relays will not toggle and power down.
- Alarm threshold
- The amount of errors that have to pass before the relays toggles on.
- Relays
- Select the relays that you want to use for this area. Make sure a relay is only used once!
Variation
With the variation tab, you can fine tune the alarms of the sensors during the day so that you can have for example different temperatures during the day. Or you can even mirror a remote climate setting the source on Using current weather.
 Area variation tab
- Source
- Select the variation type. Depending on this option, some fields will hide and other shows up.
- Period/duration
- Depending on the source, you fill in a time or a duration in minutes.
- Value
- Depending on the source, the new value that should be set at the selected time
- External source url
- This is only available with the source option
Use json sourceandUse script - Offset
- This is only available with the source option
Using current weather,Use json sourceandUse script. This is a value that will be added to the wanted current value.
Audio
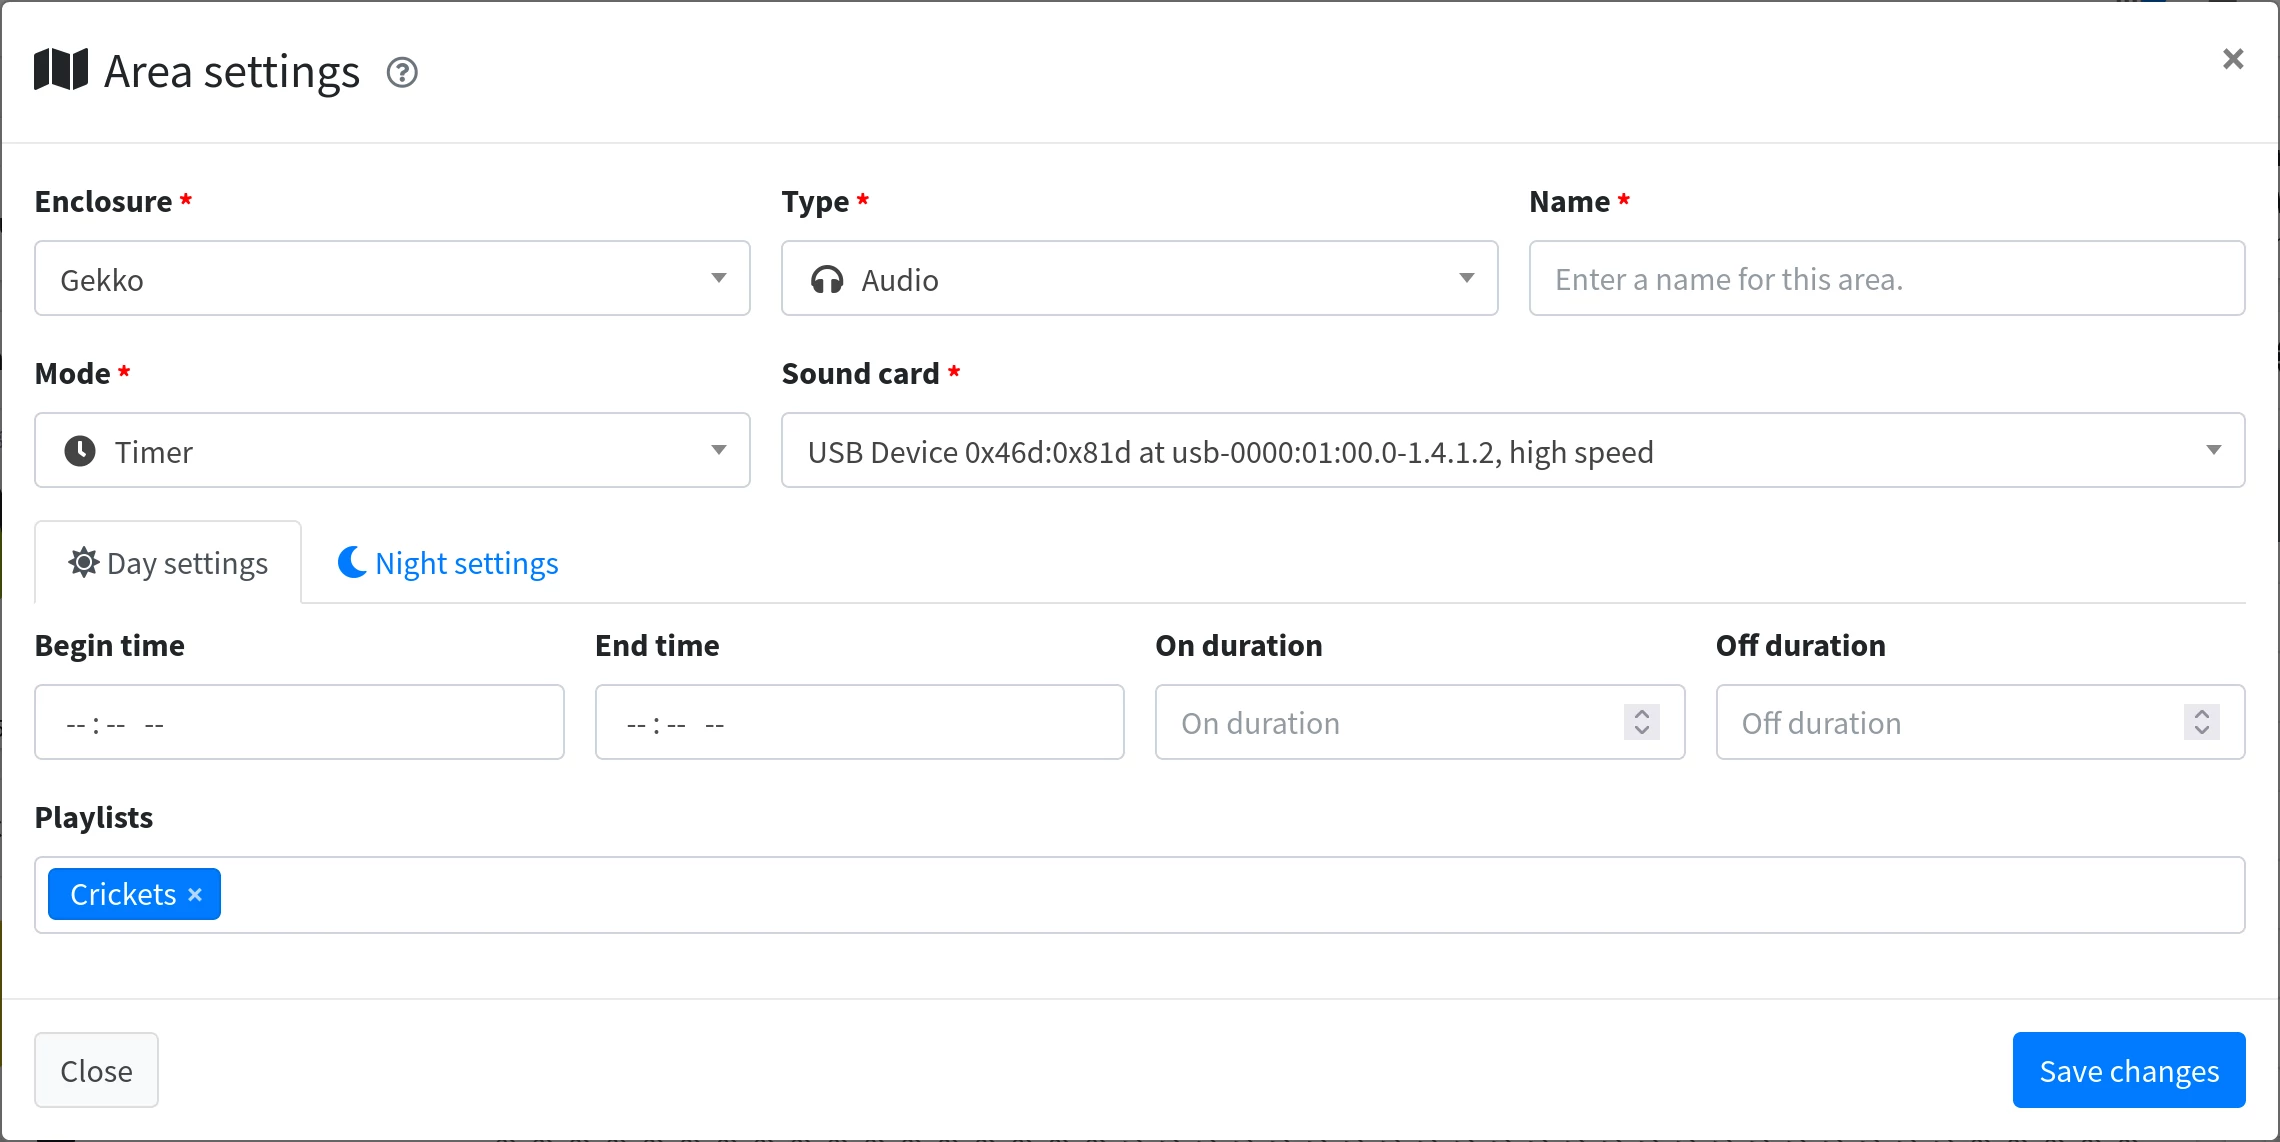 Popup form for adding and updating audio areas
- Mode *
- Sound card *
Select the sound card you want to use to play the audio.
- Playlists
- Select all the playlists you want to use. Make sure that the playlist with repeat option is selected as last.
Water tank
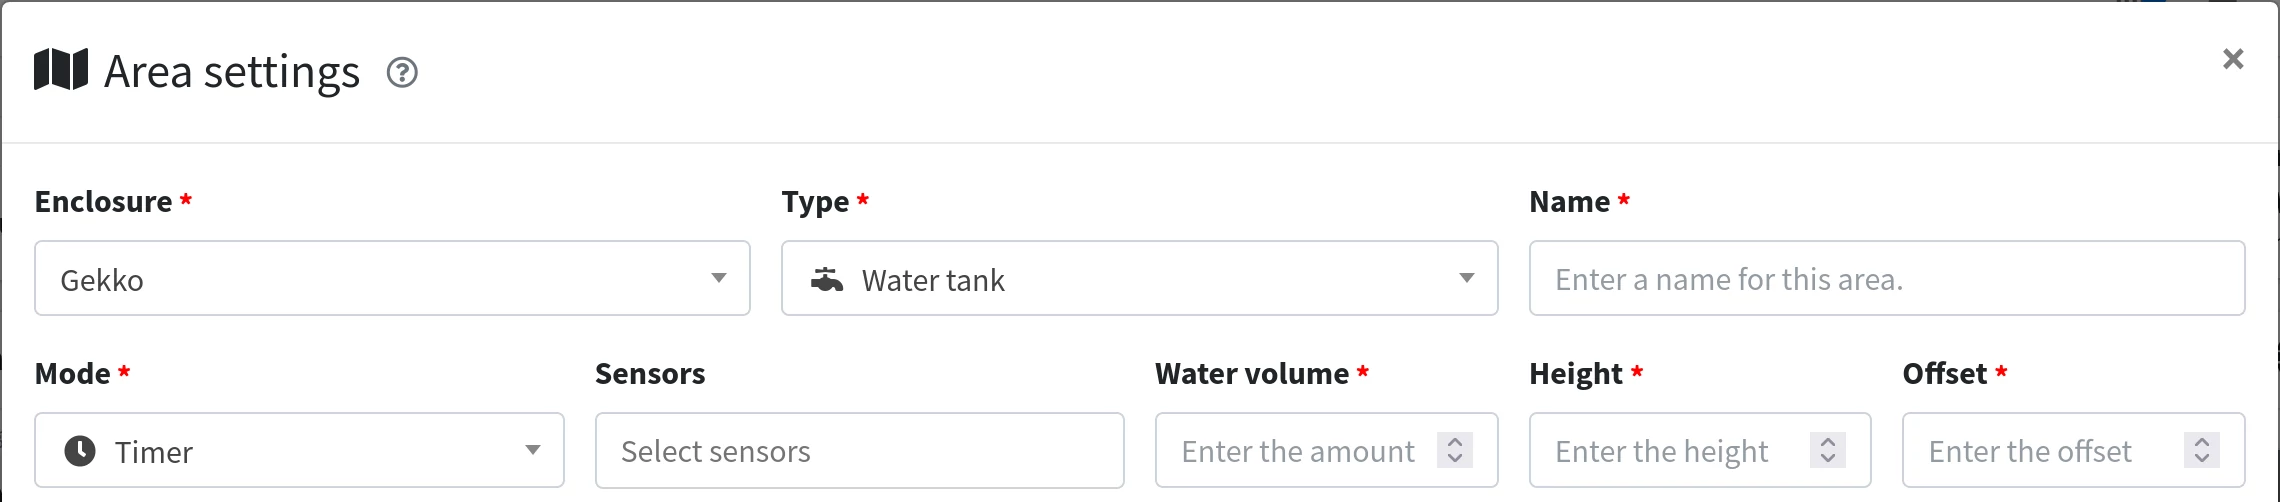 Popup form for adding and updating water tank areas
The water tank area is a bit special. This can be used to measure your water levels in a tank. This is done by using HC-SR04 ultrasonic ranging sensor.
- Mode *
- Sensors
- Select the sensors you want to use with this type of area. Only distance sensors can be used here.
- Water volume *
Enter the total amount of water that the tank can hold in litres
- Height *
Enter the height of the water tank in centimeters
- Offset *
Enter the distance between the sensor and the top of the water level in centimeters
Other options are the same the other areas. You can use water pumps to fill your water tank based on the alarm values.