Scenarios

On this page you can find various information on how to setup areas and create scenarios.
Timer wizard
Using the weather or timer mode in an area, you can set the following 6 fields. The minimal fields that needs to be entered are the begin and end time field. All other fields are optional. Using a value of '' or 0 will ignore the setting. Change some values in the form to see the outcome of the timer schedule.
The graph area in red is the time the relay(s) are toggled on
And when you have selected sensors, used light state or door state, then the relay will only go on when that state is met during the on period in the red are of the graph.
| Operating window | |||
|---|---|---|---|
| Begin time * | End time * | ||
| Enter the begin and end time off the operating window in which the relay(s) may operate | |||
| Timer periods | |||
| On duration | Off duration | ||
| Enter a duration in minutes where the relay(s) are toggled on and off. This will create timer(s) | |||
| Fine tuning | |||
| Running time | Settle time | ||
| Enter a duration in seconds which the relay(s) are on and the settle timeout | |||
Sensor based control
It is possible to control an area based on one or more sensors (of the same type). This way you can create an area where it will stay withing a certain operating temperature or humidity. In the example below we try to keep a part of the terrarium at around 23 degrees celsius during the night.


Configure a relay
Make sure you have created a relay that is controlling the heating device. This can be a normal on/off relay or a dimmer. In the example here we us a on/off relay. For setting up a relay look at the relay hardware page
Configure sensors
First make sure you have all the sensors you want to use configured correctly. This means setting the wanted min and max alarm values to the range you want to create. With multiple sensors, the average will be used of all the selected sensors.

The min and max alarm values will become the triggers for the relay that is controlling a heater device like a lamp or heating mat. In the above example the relay will go on when the temperature is below 21 degrees celsius and will shutdown when the temperature is above 25 degrees celsius
For more about setting up sensors look at the hardware page
Configure area
The final step is to add an area to an existing enclosure. This will combine the sensors and relays you want to use. There are a lot of options to setup, but we are now looking at the red underlined fields: Mode, Sensors, Relays and Light status.
Start by creating a heating type area and give it a name.
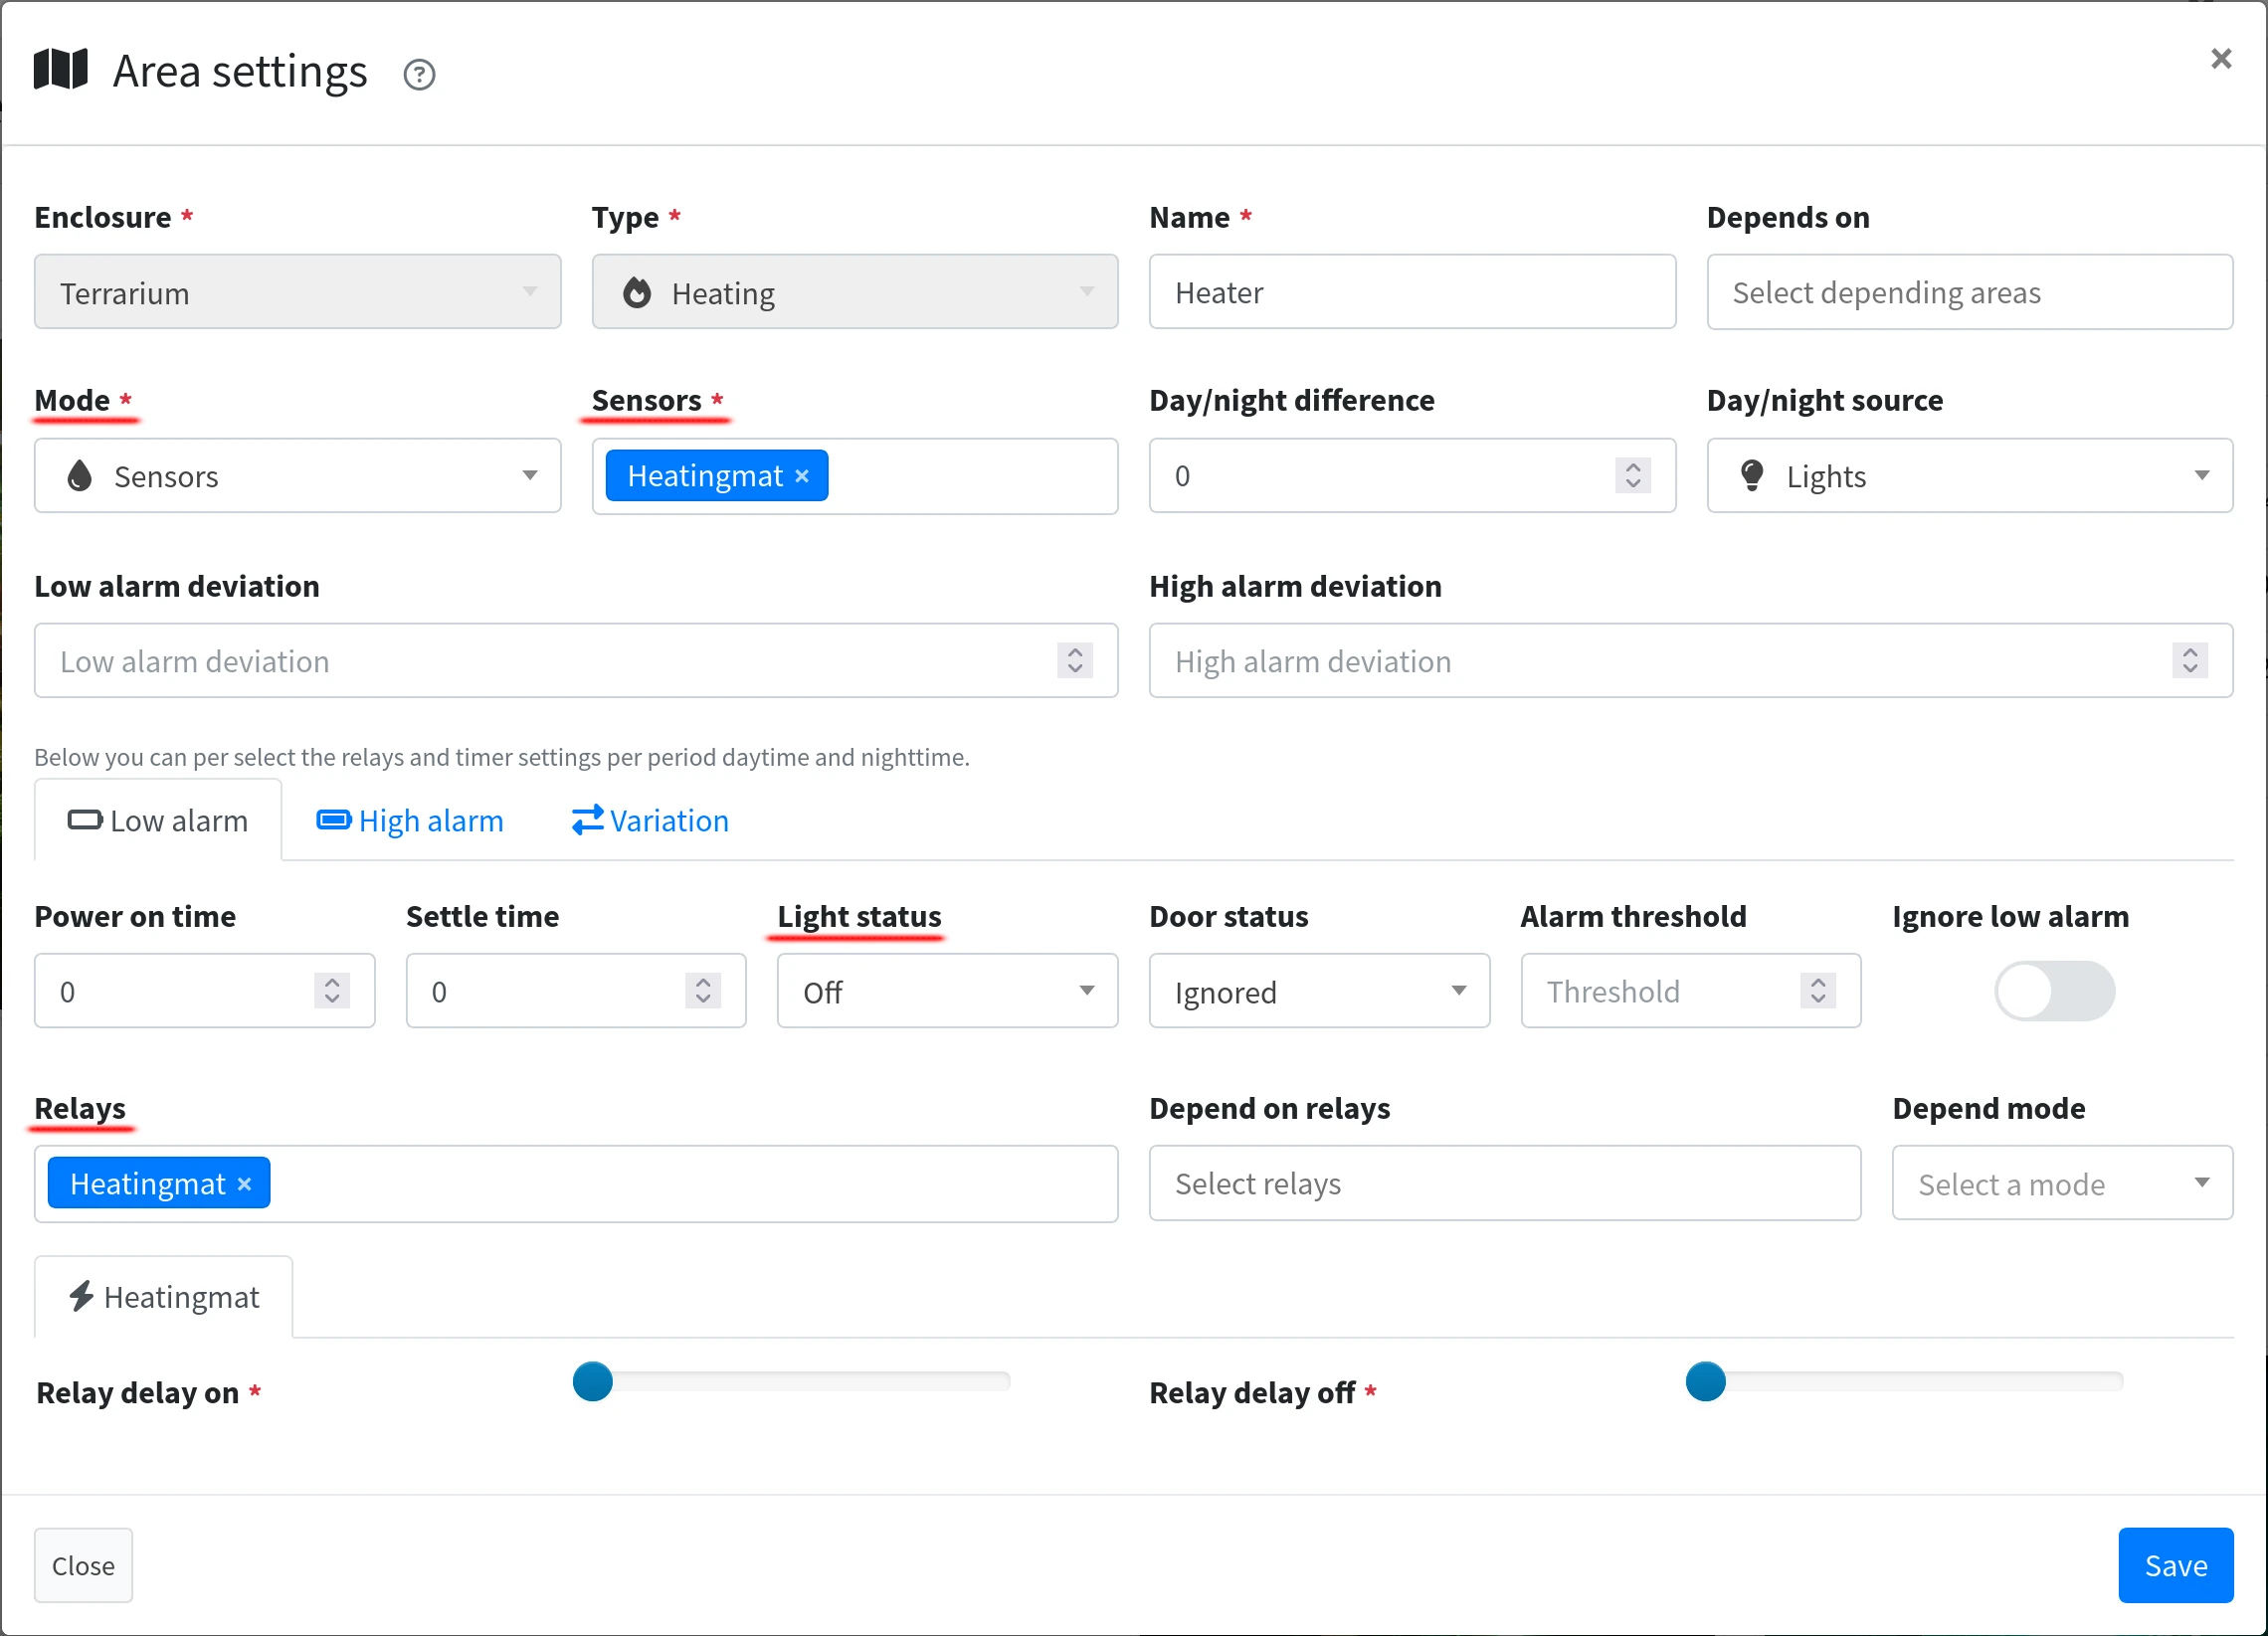
Set the area mode to sensors. This will make the area trigger the relays based on sensor values. Next to it, select the sensors you want to use. You can only select sensors of the same type as the area type.
Next select the relays that control the heater device at the low alarm tab. When a relay is selected, you can adjust the toggle on with some delay it needed. For now, keep it all at zero, so the relay will toggle when the alarm is triggered.
And in this example, the relay should only toggle on, when the lights are off. Because during the day it is warm enough, so this heater should only run when the lights are off.
In case you have also a cooling device, you can also add relays at the high alarm tab. This will trigger the cooler to run when it is getting to hot. But this is optional.
Dependencies
There are multiple dependencies levels. Here we describe all the different dependencies that are possible to use.
General dependencies
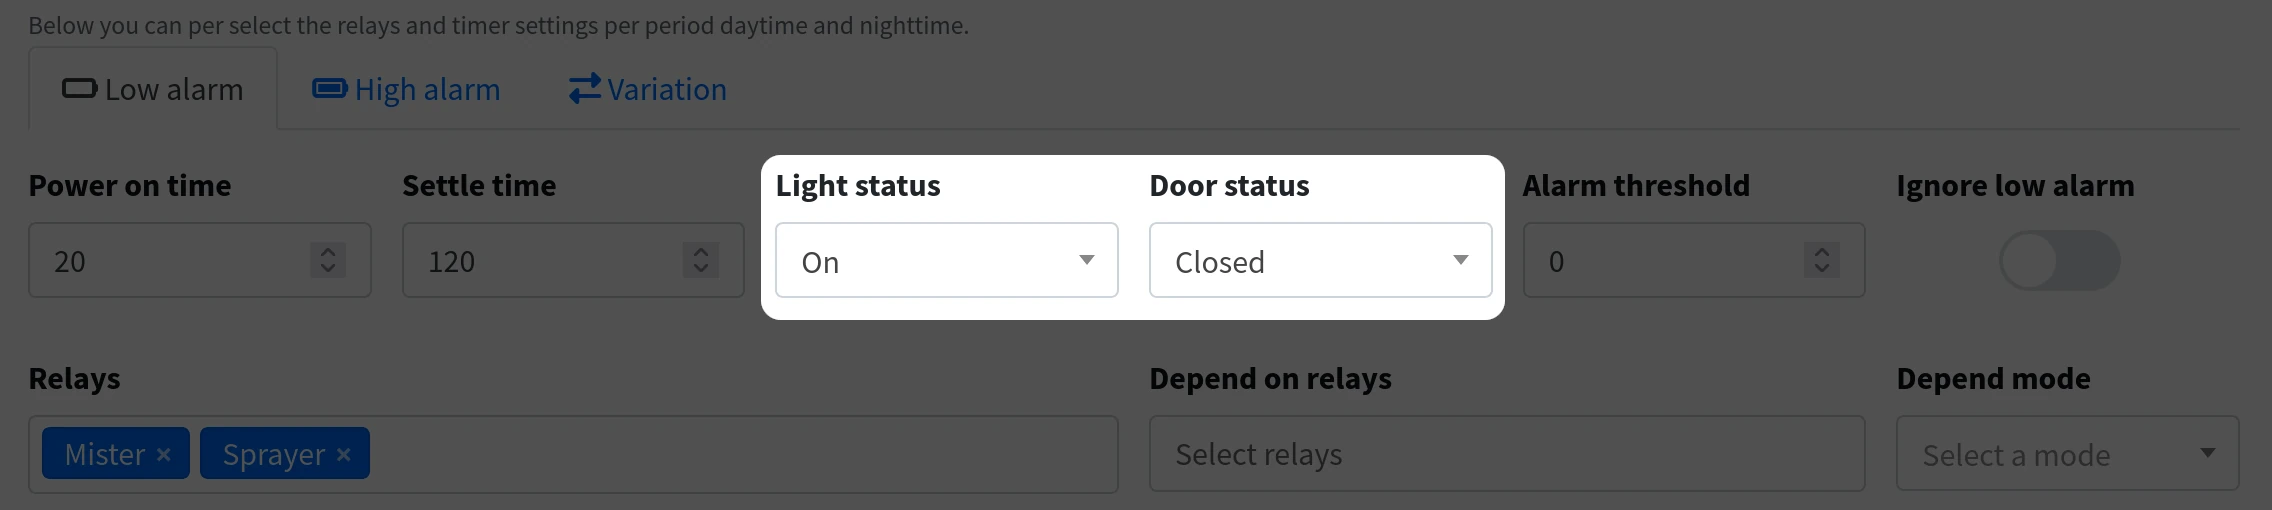
There are 2 basic dependencies. When you choose something other than Ignore, then the selected option will be enforced.
These are:
- Light status
- On
- Off
- Ignore
- Door status
- Closed
- Open
- Ignore
- In this case, the main lights needs to be on, so it is day, and the water of the sprayer can vaporize.
- And the door needs to be closed. So you are sure that when you are working in the terrarium, and the door is open, you will not get wet.
Area dependency

Here you can select other areas on which this area depends on. If the depending area is in an alarm state, this area will not toggle on, or if already on, toggle off.
For example you have a water tank area and a humidity area where you use a sprayer. When the water tank is (near) empty the low alarm of the water tank will go on, and this humidity area will then not toggle on.
This will protect the water sprayer against running hot/dry when there is no water.
Relay dependency
With relay dependencies you can make extra complex logic. A possibility is to 'share' a relay between two areas. As the basic rule is that a relay can only be used once. In order to 'share' a relay between the areas you need to create a new third area. In the third area you can select a timer window to toggle the 'shared' relay on. And select the relays used in the other two areas as dependening relays. And choice that at least one on dependency mode.
This way the relay in the third area will only go on when one of the selected relays of other areas are on.
When you select depending relays, you also need to select the dependency mode. There are 3 dependency modes:
- All on
- At least one on
- None on
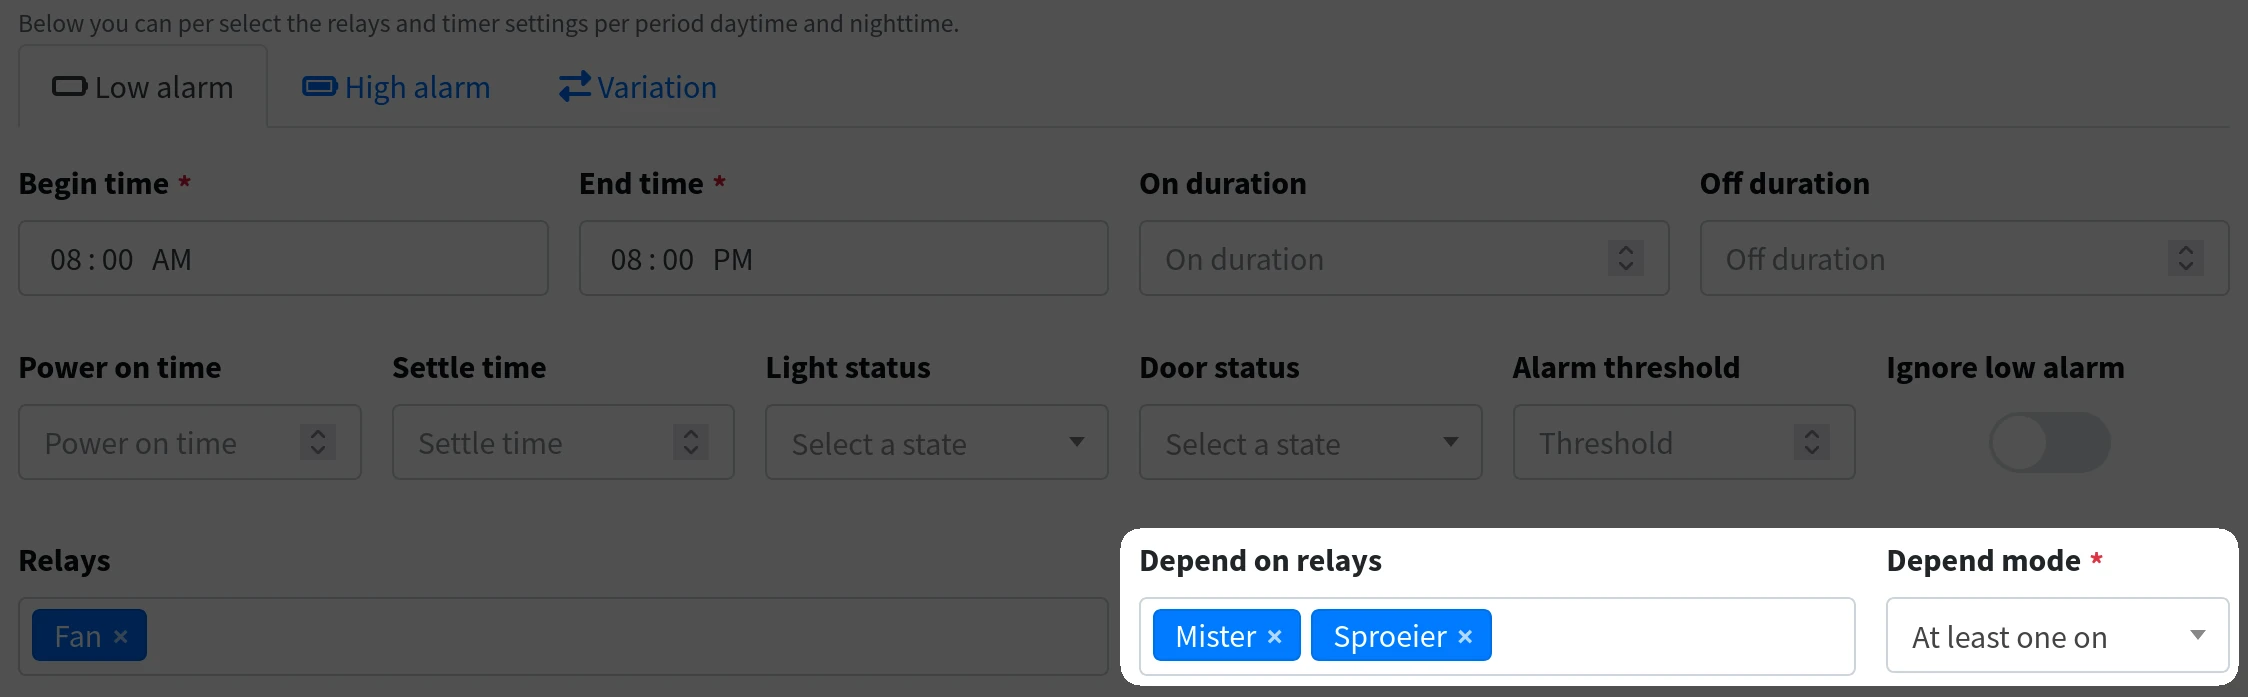
In the example above we have selected an area which is controlling a fan. This will clear the air in the terrarium and should be running when there is either the rain relay is toggled on or the mister relay is toggled on. In this case, those relays are in different areas with different logic. The fan should be on based on a timer from 08:00 till 20:00 hours. This is a 12 hour on time.
But with the selected dependency relays, this area will only go on when on of the two selected relays is on. And when there is no depending relay is on, the power of this area will also shut down. So the fan will only be running when either the mister is running, or the sprayer is running.
You can also use the 'Power on time' and 'Settle time' values to fine tune.