FAQ

Here you can find the most frequently asked question.
-
If TerrariumPI is running for years it happens that the database get rather big and therefore slowing down the system. Also deleting the data will not give back the disk space. So there is a script which can cleanup the database and reclaim disk space by reducing the database.
In order to cleanup the database, make sure that TerrariumPI is stopped! Else there is a possibility on database corruption.
When you cleanup the database, we need at least the same amount of free space as the size of the database. The script will check this. Make sure you have enough free disk space. If this is a problem, you can also try to download the database and run this on a desktop/laptop.
The cleanup can take up to 1 hour!. So make sure your environment is stable and can survive for that period.
- Enter the TerrariumPI folder:
cd /home/pi/TerrariumPI/ - Enable Python3 virtual environment:
source venv/bin/activate - Go to the folder ‘contrib’:
cd contrib - Run the command:
python db_cleanup.py
This will start the script. It will first show some information about required disk space and how much data will be kept.
1
2
3
4
5
6
7
8
9
10
11
12
13
14
15

This script will cleanup your terrariumpi.db file. We will keep 420 days of data from now. If you want to make a backup first, please enter no and make your backup.
Database size: 2.95 GB, free disk space: 6.45 GB
Would you like to continue? Enter yes to start. Anything else will abort.
yes
Start cleaning up table ButtonHistory ...
Table ButtonHistory contains 33573 records, of which being deleted 11119 records 33.12%.
Deleting data done in 0.46 seconds
Start cleaning up table SensorHistory ...
Table SensorHistory contains 18550092 records, of which being deleted 6187087 records 33.35%.
Deleting data done in 444.98 seconds
Start reclaiming lost space. This will rebuild the database and give all the delete space back. This will take a lot of time
Vacuuming database done in 1545.62 seconds
Database is now cleaned and should be reduced in size. TerrariumPI can now be started.
Database size: 1.95 GB, free disk space: 7.45 GB
Cleaned up 1 GB
When this done, you can restart TerrariumPI again.
- Enter the TerrariumPI folder:
-
By default all logging is done in the folder log where the actual log files are written to a temporary memory share. This is done to reduce the write wear on the SD card. A downside is that when the Pi reboots, all log info of that day is gone. During the night, the log file will be archived and that is stored on the SD card. So archived log files will survive reboots.
In order to change the default logging of TerrariumPI you only need to create your own custom logging configuration file with the name
logging.custom.cfgand place that in thelogfolder. So start with:cp logging.cfg log/logging.custom.cfgAnd start editing the
log/logging.custom.cfgfile with an editor. After editing restart TerrariumPI and the new logging will be loaded.Enable debug
In order to enable debug messages add the
fileHandlerDebughandler to thehandlersin section[logger_root]Syslog (local and remote)
In order to enable (remote) syslog logging add the
syslogHandlerhandler to thehandlersin section[logger_root]. Then you have to configure to use either the local syslog server or a remote syslog server. By default it uses the local syslog. To use remote change:'/dev/log' to ('hostip',portnr)Local:
args=('/dev/log','local6')Remote:args=(('192.168.1.1',514),'local6')Next you need to tell Syslog which facility it is using. The default is
LOCAL6. To enable this, create a file in the folder/etc/rsyslog.dfor example:/etc/rsyslog.d/terrariumpi.confAnd add then:
local6.* /var/log/terrariumpi.logFinally restart rsyslog and you should receive log messages from TerrariumPI
-
Some Energenie USB devices are to new to detect with the current software. In order to make those Energenie USB devices work, you need to manually update a software package and restart TerrariumPI.
Upgrade steps can be found here
This is already done in the Docker image.
-
There are several ways to contact the developers of TerrariumPI. Here you can see how:
- Github for feature requests and bugs
- Try the TerrariumPI Matrix channel
- Use the email icon in the lower left part of the menu.
-
- Stop the TerrariumPI service:
sudo service terrariumpi stop. - Enter the TerrariumPI folder:
cd /home/pi/TerrariumPI/ - Enable Python3 virtual environment:
source venv/bin/activate - Manual start TerrariumPI:
python terrariumPI.py
This should start the TerrariumPI in console mode. So all errors should now be visible to the console.
When the log line
TerrariumPI 4.X.Y is up and running at address: http://0.0.0.0:8090 in XX.XX secondsappears, TerrariumPI is fully started and you can enter the web gui as normal.When you are done debugging, you can press
Ctrl+Conce to stop TerrariumPI.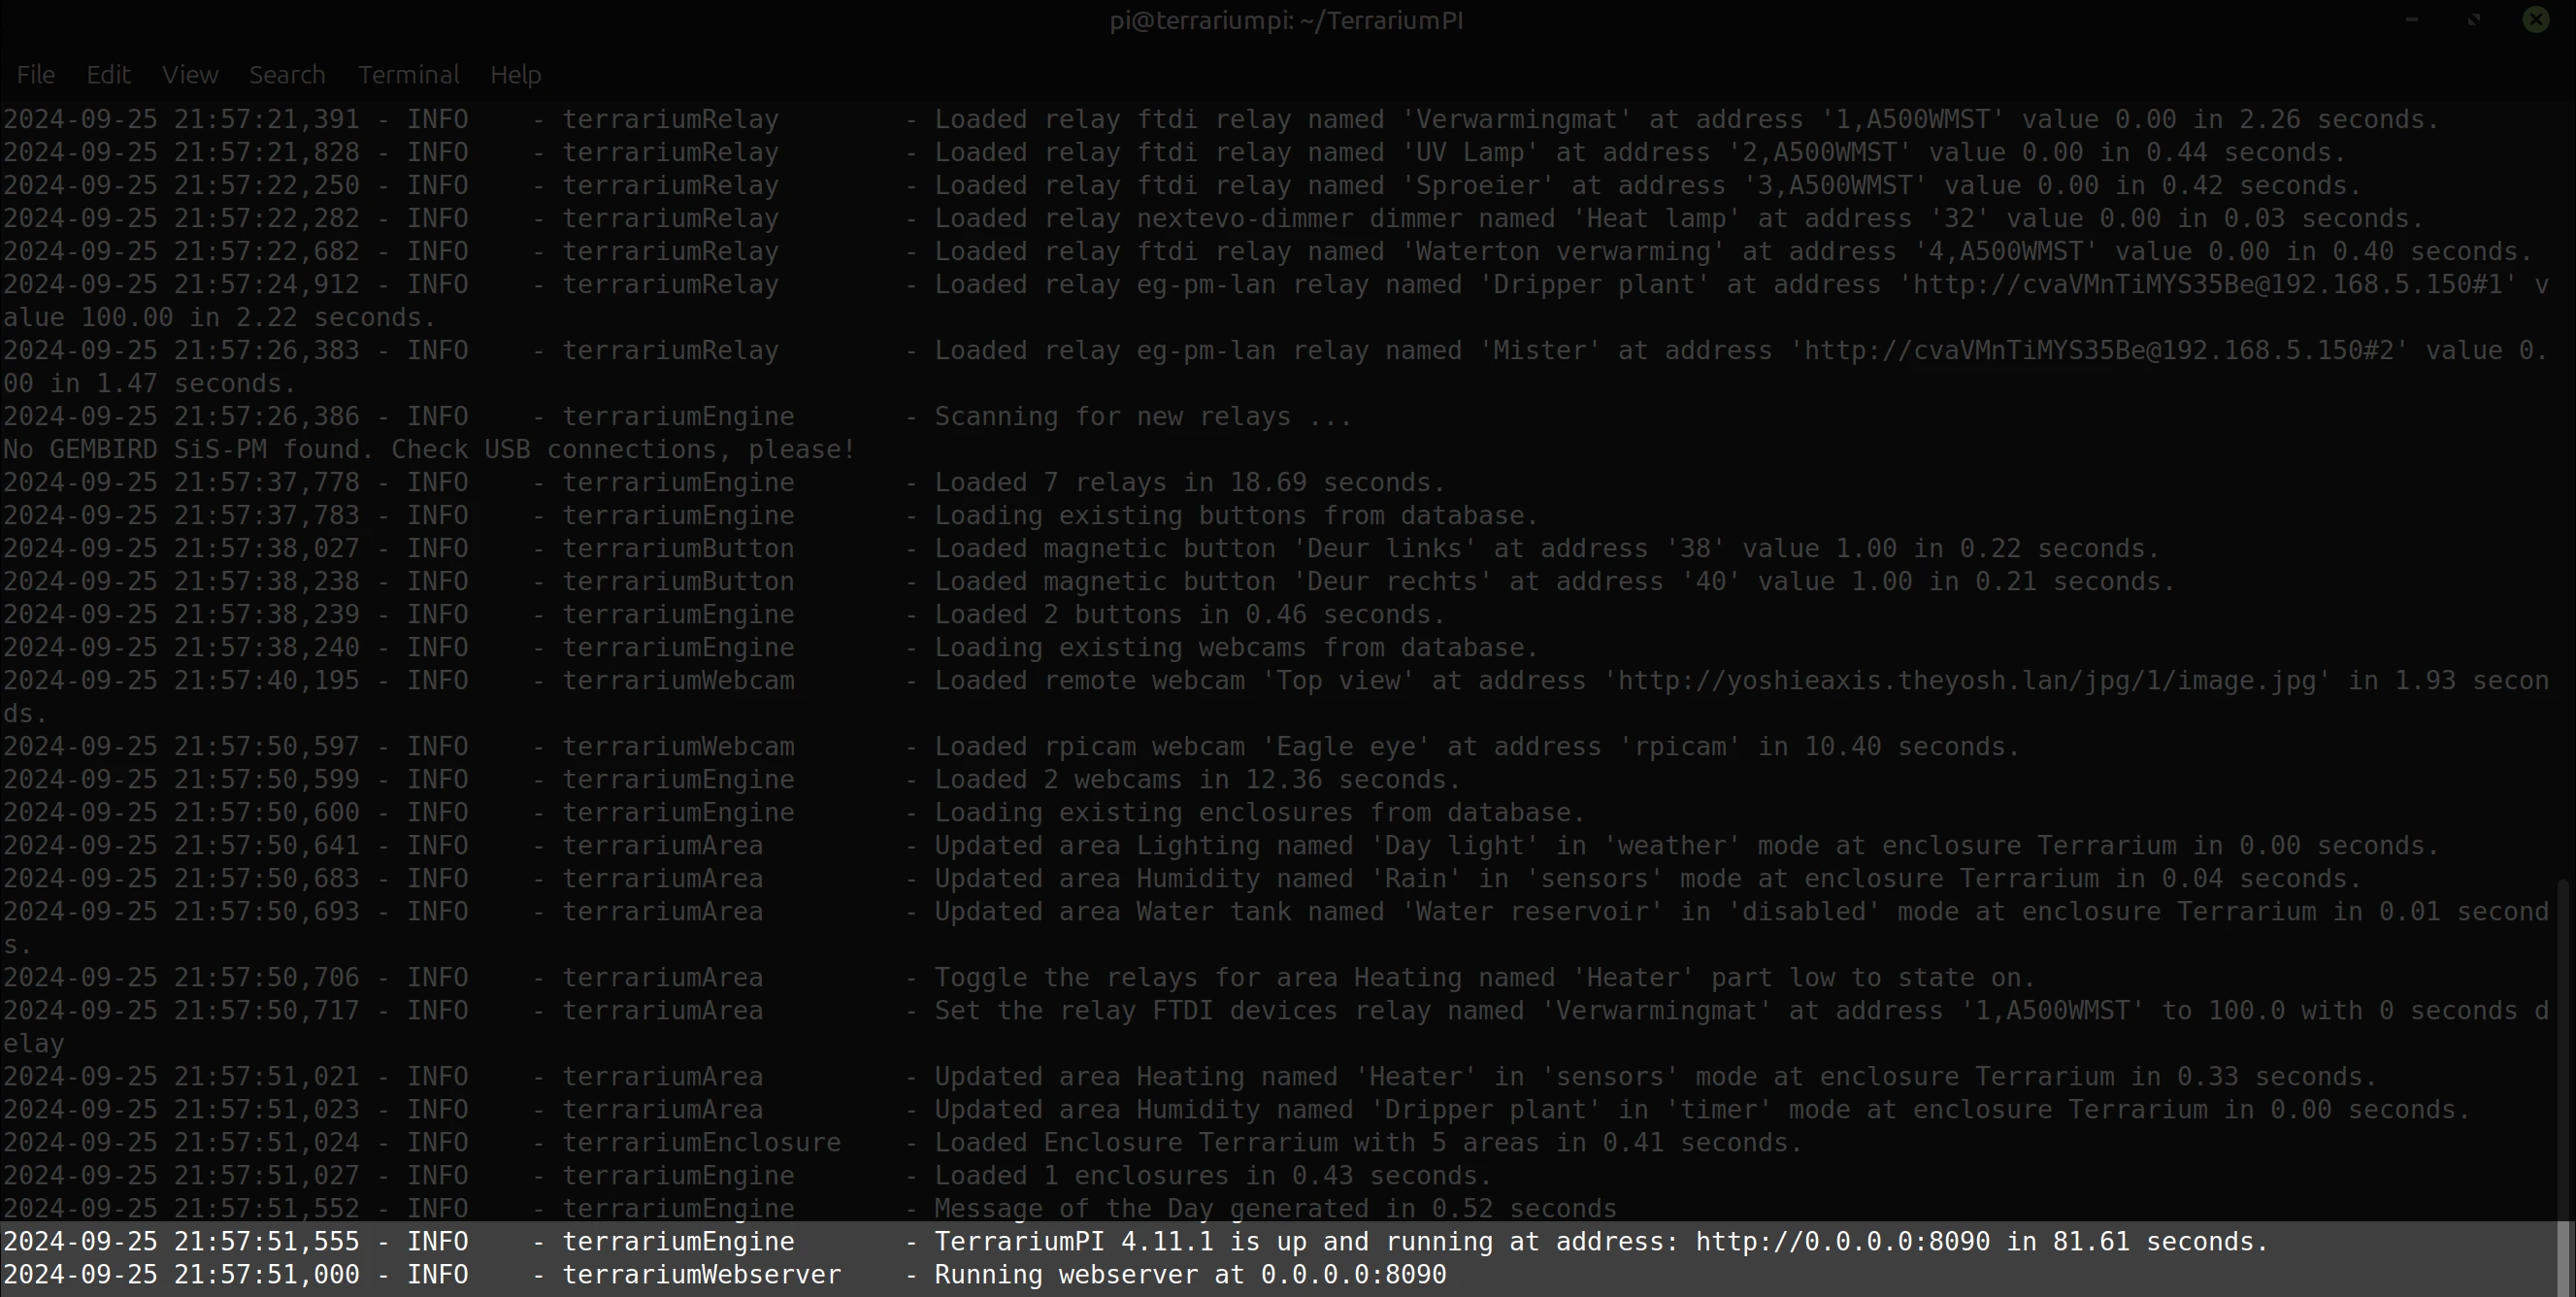
- Stop the TerrariumPI service:
-
When you want to delete a sensor/relay/button that has been used for more than 3 months, you should use the manual/debug way to delete the sensor through the GUI. This is due to the time it takes to delete the data from the Sqlite database. If this takes more then 2 minutes, the systemd watchdog will restart TerrariumPI and the delete will not succeed.
In order to not have the problem of the 2 minutes watchdog timeout, you have to run TerrariumPI in debug mode. You can stop TerrariumPI as follows.
When running in debug mode, you can just go the sensor/relay/button and delete it. Now it does not matter how much time it takes. Just wait until done.
If the deleting is done, stop the debug version of TerrariumPI and start normally.
-
TerrariumPI is using systemd for startup. Here you can find the commands to manually start, stop or restart it. Also there is an option to disable or enable TerrariumPI at boot up.
Start
run
sudo service terrariumpi startto start TerrariumPIStop
run
sudo service terrariumpi stopto stop TerrariumPIRestart
run
sudo service terrariumpi restartto restart TerrariumPIEnable startup
run
sudo systemctl enable terrariumpito enable TerrariumPI at startupDisable startup
run
sudo systemctl disable terrariumpito disable TerrariumPI at startup -
Depending on your setup, follow the docker or manual upgrade steps at the installation page.
-
A much asked question is how can a relay used in 2 or more areas. By default this is not possible, due to the a relay can only be used once policy. This made it a bit easier to make sure that relays stays in the correct state. Even after power failures.
But there is a solution. In this FAQ we explain how to setup a relay to used in multiple areas. This can either be a relay or a dimmer. It should work for both.
Add original relay
First add the original relay to TerrariumPI and make sure it works. Enter the power usage and the water usage values. But never use this original relay in any area.
Create script relay code
- Create a scripts folder if not exists:
mkdir scripts - Copy
duplicate_switch.pyto thescriptsfolder:cp contrib/duplicate_switch.py scripts/ - Edit the new script to set some settings:
nano scripts/duplicate_switch.py- Edit the variables
RELAY_ID,USERNAME,PASSWORD. The RELAY_ID can be found on the page: http://[TerrariumPI_IP]:8090/api/relays/
- Edit the variables
When this is all done, you can test if it al works by running the command:
scripts/duplicate_switch.py 100which should toggle on the original relay.Duplicate the relay
Now it is easy to duplicate this relay a couple of times. Make sure you are on the
scriptsfolder where the fileduplicate_switch.pyis placed.Now by running the following command we will create a symlink to the original file. Now you will have 2 files with the same contents and will the same original relay.
1

ln -s duplicate_switch.py duplicate_switch_2.py
This can be done multiple times. Make sure you have a unique name for every new symlink.
Adding the new relays to TerrariumPI
Now add the new scripts as new script relay to TerrariumPI. Use as address
/home/pi/TerrariumPI/scripts/duplicate_switch.py.But here, do not enter the power and water flow values. Else the amount of used power and water will be counted double. Which is not correct.
Now you can use the new script relay in an area.
- Create a scripts folder if not exists:
-
It is possible to use remote data with TerrariumPI. At the moment, only JSON and plain text are supported as content types.
Rate limits
If you use a sensor, relay or any other remote service, make sure that the other side can handle a request every 30 seconds. This is the frequency of the updates.
Url format
The remote data url is a full url to the JSON output appended with a dash ‘#’ and the JSON traversal path
http(s)://remote.server.com:portnumber/path_to_json_output#json/traversal/pathExample
Remote source url:
https://terrarium.theyosh.nl/api/sensors/e39b7d7931f8db191cedd83f3c80cec4/json output:
1
2
3
4
5
6
7
8
9
10
11
12
13
14
15
16
17
18
19

{
  "id": "e39b7d7931f8db191cedd83f3c80cec4",
  "hardware": "owfs",
  "type": "temperature",
  "name": "Midden links",
  "address": "2653D18D0100006A",
  "limit_min": 10,
  "limit_max": 45,
  "alarm_min": 20,
  "alarm_max": 30,
  "max_diff": 0,
  "exclude_avg": false,
  "calibration": {
    "offset": 0
  },
  "value": 23.7188,
  "alarm": false,
  "error": false
}
json traversal path:
valueConstruct full url by combining the remote source url and the json traversal path joining by a dash ‘#’. Full remote source url:
https://terrarium.theyosh.nl/api/sensors/e39b7d7931f8db191cedd83f3c80cec4/#valueand that will return the value of ‘23.7188’And for the calibration offset value you need the path
#calibration/offset -
When you see the following error in the TerrariumPI logging you need to enable
Third-Party Compatibility featurein the app.Kasa error
1
2
3
4
5
6
7
8
9
10
11
12
13
14
15
16
17
18
19
20
21
22
23
24
25
26
27
28
29
30
31
32
33
34
35
36
37

2025-12-11 03:47:55,212 - ERROR   - hardware.relay.kasa_relay - Server response does not match our challenge on ip 192.168.1.XXX
Traceback (most recent call last):
  File "/TerrariumPI/hardware/relay/kasa_relay.py", line 75, in _get_hardware_value
    data = self.__asyncio.run(__get_hardware_state())
           ^^^^^^^^^^^^^^^^^^^^^^^^^^^^^^^^^^^^^^^^^^
  File "/TerrariumPI/terrariumUtils.py", line 65, in run
    return data.result()
           ^^^^^^^^^^^^^
  File "/usr/local/lib/python3.11/concurrent/futures/_base.py", line 456, in result
    return self.__get_result()
           ^^^^^^^^^^^^^^^^^^^
  File "/usr/local/lib/python3.11/concurrent/futures/_base.py", line 401, in __get_result
    raise self._exception
  File "/TerrariumPI/hardware/relay/kasa_relay.py", line 63, in __get_hardware_state
    await self.device.update()
  File "/opt/venv/lib/python3.11/site-packages/kasa/smartdevice.py", line 353, in update
    response = await self.protocol.query(req)
               ^^^^^^^^^^^^^^^^^^^^^^^^^^^^^^
  File "/opt/venv/lib/python3.11/site-packages/kasa/iotprotocol.py", line 43, in query
    return await self._query(request, retry_count)
           ^^^^^^^^^^^^^^^^^^^^^^^^^^^^^^^^^^^^^^^
  File "/opt/venv/lib/python3.11/site-packages/kasa/iotprotocol.py", line 59, in _query
    raise auex
  File "/opt/venv/lib/python3.11/site-packages/kasa/iotprotocol.py", line 48, in _query
    return await self._execute_query(request, retry)
           ^^^^^^^^^^^^^^^^^^^^^^^^^^^^^^^^^^^^^^^^^
  File "/opt/venv/lib/python3.11/site-packages/kasa/iotprotocol.py", line 86, in _execute_query
    return await self._transport.send(request)
           ^^^^^^^^^^^^^^^^^^^^^^^^^^^^^^^^^^^
  File "/opt/venv/lib/python3.11/site-packages/kasa/klaptransport.py", line 309, in send
    await self.perform_handshake()
  File "/opt/venv/lib/python3.11/site-packages/kasa/klaptransport.py", line 279, in perform_handshake
    local_seed, remote_seed, auth_hash = await self.perform_handshake1()
                                         ^^^^^^^^^^^^^^^^^^^^^^^^^^^^^^^
  File "/opt/venv/lib/python3.11/site-packages/kasa/klaptransport.py", line 233, in perform_handshake1
    raise AuthenticationException(msg)
kasa.exceptions.AuthenticationException: Server response does not match our challenge on ip 192.168.1.XXX
More information can be found at the Kasa relay page
Tapo
1
2
3
4
5
6
7
8
9
10
11
12
13
14
15
16
17
18
19
20
21

2026-03-11 11:54:02,902 - WARNING - terrariumRelay        - Could not load hardware for relay TAPO P100/5 relay named 'Heat mat' at address '...': Failed to initialize protocol, retrying in 0.5 seconds...
Exception: Error code: 1003
    raise Exception(f"Error code: {data['error_code']}")
  File "/home/pi/TerrariumPI/venv/lib/python3.9/site-packages/PyP100/auth_protocol.py", line 173, in _request_raw
    result = self._request_raw("handshake", {"key": public_key})
  File "/home/pi/TerrariumPI/venv/lib/python3.9/site-packages/PyP100/auth_protocol.py", line 244, in Initialize
    protocol.Initialize()
  File "/home/pi/TerrariumPI/venv/lib/python3.9/site-packages/PyP100/PyP100.py", line 35, in _initialize
Traceback (most recent call last):
2026-03-11 11:54:02,890 - ERROR   - PyP100.PyP100         - Failed to initialize protocol OldProtocol
2026-03-11 11:54:02,882 - ERROR   - root                  - Wrong message formatting invalid syntax (<string>, line 1)
2026-03-11 11:54:02,877 - ERROR   - PyP100.auth_protocol  - Error: {'error_code': 1003}
requests.exceptions.HTTPError: 403 Client Error: Forbidden for url: http://the.ip/app/handshake1
    raise HTTPError(http_error_msg, response=self)
  File "/home/pi/TerrariumPI/venv/lib/python3.9/site-packages/requests/models.py", line 1026, in raise_for_status
    resp.raise_for_status()
  File "/home/pi/TerrariumPI/venv/lib/python3.9/site-packages/PyP100/auth_protocol.py", line 45, in _request_raw
    response = self._request_raw("handshake1", local_seed)
  File "/home/pi/TerrariumPI/venv/lib/python3.9/site-packages/PyP100/auth_protocol.py", line 95, in Initialize
    protocol.Initialize()
  File "/home/pi/TerrariumPI/venv/lib/python3.9/site-packages/PyP100/PyP100.py", line 35, in _initialize
More information can be found at the Tapo P100 relay page
-
The software can produce some warning and deprecation messages. And here is a list of known messages which you can ignore.
Bottle
1
2

/home/pi/TerrariumPI/venv/lib/python3.7/site-packages/bottle.py:3383: DeprecationWarning: Absolute template path names are deprecated.
  fname = self.search(name, self.lookup)
This message is very old, and TerrariumPI does not use bottle template engines. So this message can be ignored.
Cryptography
1
2

/home/pi/TerrariumPI/venv/lib/python3.7/site-packages/telegram/_passport/credentials.py:25: CryptographyDeprecationWarning: Python 3.7 is no longer supported by the Python core team and support for it is deprecated in cryptography. A future release of cryptography will remove support for Python 3.7.
  from cryptography.hazmat.backends import default_backend
This is a warning that in the next update of Cryptography, python 3.7 is not supported anymore. This impacts only old buster OS. For now, we can still use it.
-
Warning This is an advanced setting override, and therefore make sure what you are doing!! Warning
By default the TerrariumPI Engine is updating its state every 30 seconds. This also means that relays are only triggered every 30 seconds. This can mean that a relay is turned at max 29 seconds to late. As the previous run was 1 second before the time schedule.
Keep in mind that sensor read outs will still be cached for 30 seconds. So new sensor data will only available every 30 seconds.
This value can be overridden to set it at a lower value.
Manual
- Create the folder ‘terrariumpi.service.d’:
sudo mkdir -p /etc/systemd/system/terrariumpi.service.d/ - Create a file called ‘override.conf’ with the following contents:
sudo nano /etc/systemd/system/terrariumpi.service.d/override.conf\
1
2

[Service]
Environment="TPI_ENGINE_TIMEOUT=15"
for a TerrariumPI Engine timeout of 15 seconds 3. Reload systemd daemon:
sudo systemctl daemon-reload4. Restart TerrariumPI:sudo service terrariumpi restartDocker
Edit the docker compose file and add the environment variable
TPI_ENGINE_TIMEOUT: 151 2 3 4
services: terrariumpi: environment: TPI_ENGINE_TIMEOUT: 15 - Create the folder ‘terrariumpi.service.d’:
-
When you loose your password, there is no way to retrieve it. So you need to manually reset it. Use the following steps to clear your existing password, and generate a new one.
- Stop TerrariumPI (FAQ)
- Enter the TerrariumPI folder
cd /home/pi/TerrariumPI/data - Load the database
sqlite3 terrariumpi.db - Delete admin password
delete from Setting where id = 'password'; - Exit sqlite3 by pressing
Ctrl+D - Start TerrariumPI (FAQ)
Now you should be able to login with chosen username and password password
-
If you have configured a fixed IP as address and your PI has changed the IP due to a network change, the TerrariumPI software will not load the web gui. The system is still running, but you are unable to access the webgui.
An error could look like:
1
2
3
4
5
6
7
8
9
10
11
12
13
14
15
16
17
18
19
20
21
22
23
24
25
26
27
28
29

2023-11-01 10:39:59,000 - INFO    - terrariumWebserver    - Running webserver at 192.168.1.2:8090
Traceback (most recent call last):
  File "terrariumPI.py", line 16, in <module>
    terrariumEngine = terrariumEngine(__version__)
  File "/home/pi/TerrariumPI/terrariumEngine.py", line 175, in __init__
    self.webserver.start()
  File "/home/pi/TerrariumPI/terrariumWebserver.py", line 306, in start
    quiet=True)
  File "/home/pi/TerrariumPI/venv/lib/python3.7/site-packages/bottle.py", line 767, in run
    run(self, **kwargs)
  File "/home/pi/TerrariumPI/venv/lib/python3.7/site-packages/bottle.py", line 3175, in run
    server.run(app)
  File "/home/pi/TerrariumPI/venv/lib/python3.7/site-packages/bottle_websocket/server.py", line 17, in run
    server.serve_forever()
  File "/home/pi/TerrariumPI/venv/lib/python3.7/site-packages/gevent/baseserver.py", line 398, in serve_forever
    self.start()
  File "/home/pi/TerrariumPI/venv/lib/python3.7/site-packages/gevent/baseserver.py", line 336, in start
    self.init_socket()
  File "/home/pi/TerrariumPI/venv/lib/python3.7/site-packages/gevent/pywsgi.py", line 1545, in init_socket
    StreamServer.init_socket(self)
  File "/home/pi/TerrariumPI/venv/lib/python3.7/site-packages/gevent/server.py", line 180, in init_socket
    self.socket = self.get_listener(self.address, self.backlog, self.family)
  File "/home/pi/TerrariumPI/venv/lib/python3.7/site-packages/gevent/server.py", line 192, in get_listener
    return _tcp_listener(address, backlog=backlog, reuse_addr=cls.reuse_addr, family=family)
  File "/home/pi/TerrariumPI/venv/lib/python3.7/site-packages/gevent/server.py", line 288, in _tcp_listener
    sock.bind(address)
  File "/home/pi/TerrariumPI/venv/lib/python3.7/site-packages/gevent/_socketcommon.py", line 563, in bind
    return self._sock.bind(address)
OSError: [Errno 99] Cannot assign requested address: ('192.168.1.2', 8090)
The solution for this is to reset the IP address that was entered. Here are the steps to fix it.
- Stop TerrariumPI:
sudo service terrariumpi stop - Enter the TerrariumPI folder:
cd /home/pi/TerrariumPI/ - Open the database with sqlite:
sqlite3 data/terrariumpi.db - Run the following query statement:
DELETE FROM Setting WHERE id = 'host'; - Run the following query statement:
DELETE FROM Setting WHERE id = 'port'; - Exit the database by pressing
CTRL+d - Start TerrariumPI:
sudo service terrariumpi start
The steps 3 - 6 are shown below.
1
2
3
4
5
6

sqlite3 data/terrariumpi.db
SQLite version 3.27.2 2019-02-25 16:06:06
Enter ".help" for usage hints.
sqlite> DELETE FROM Setting WHERE id = 'host';
sqlite> DELETE FROM Setting WHERE id = 'port';
sqlite>
When TerrariumPI is started up, you should be able to access the web gui again on the new IP of the Raspberry PI
- Stop TerrariumPI:
-
If you have made regular backups, than you can restore it with the following steps. If the backup has become corrupted, follow these steps first.
- Shutdown TerrariumPI
- Remove the old files in
dataif there are any.rm data/* - Place the backup files in the
datafolder. - Remove the old files in
mediaif there are any.rm media/* - Place the backup files in the
mediafolder. - Place custom logging or webcam archives back in place if needed.
- Start TerrariumPI
This should start TerrariumPI with the backup-ed data.
-
It can happen that the database gets corrupted. The error message you will get is something like sqlite3.DatabaseError: database disk image is malformed
This can be fixed by replacing it with a backup database. If you do not have backup of that file or the backup is to old, you can try the following steps:
- Make sure TerrariumPI is not running:
sudo service terrariumpi stop - Enter the TerrariumPI folder and enable the Python environment:
cd /home/pi/TerrariumPIsource venv/bin/activate
- Enter the
contribfolder:cd contrib - Run the
fix_db.pyscript and answer the questions:./fix_db.py. This will take some time. - When done, the database should be restored.
- Start TerrariumPI
sudo service terrariumpi start
A backup of the broken database is left at
data/terrariumpi.db.broken. You can delete this database when TerrariumPI is running again.rm data/terrariumpi.db.brokenIf this happens a lot, you could look at the FAQ item: Tune database settings to improve the database storage.
- Make sure TerrariumPI is not running:
-
Currently the database SQLITE3 settings are setup for speed. And therefore it cannot handle power outages well. If you need for what ever reason a different SQLITE3 setup, you can create a file called
data/.database-envwith the following contents:1
[pragma setting name]=[value]
All SQLITE3 pragmas should be supported. Make sure you use the correct pragma name and value. Only the entered values will be overwritten from the default.
For example the current defaults are:
1
2
3
4
5

auto_vacuum=NONE
cache_size=-10000
journal_mode=WAL
synchronous=OFF
temp_store=MEMORY
If you need more stability you can use the following settings:
1

synchronous=FULL -
Create a free account at Unsplash.
After that, you need to create an app in Unsplash. Check all the boxes and accept the terms.
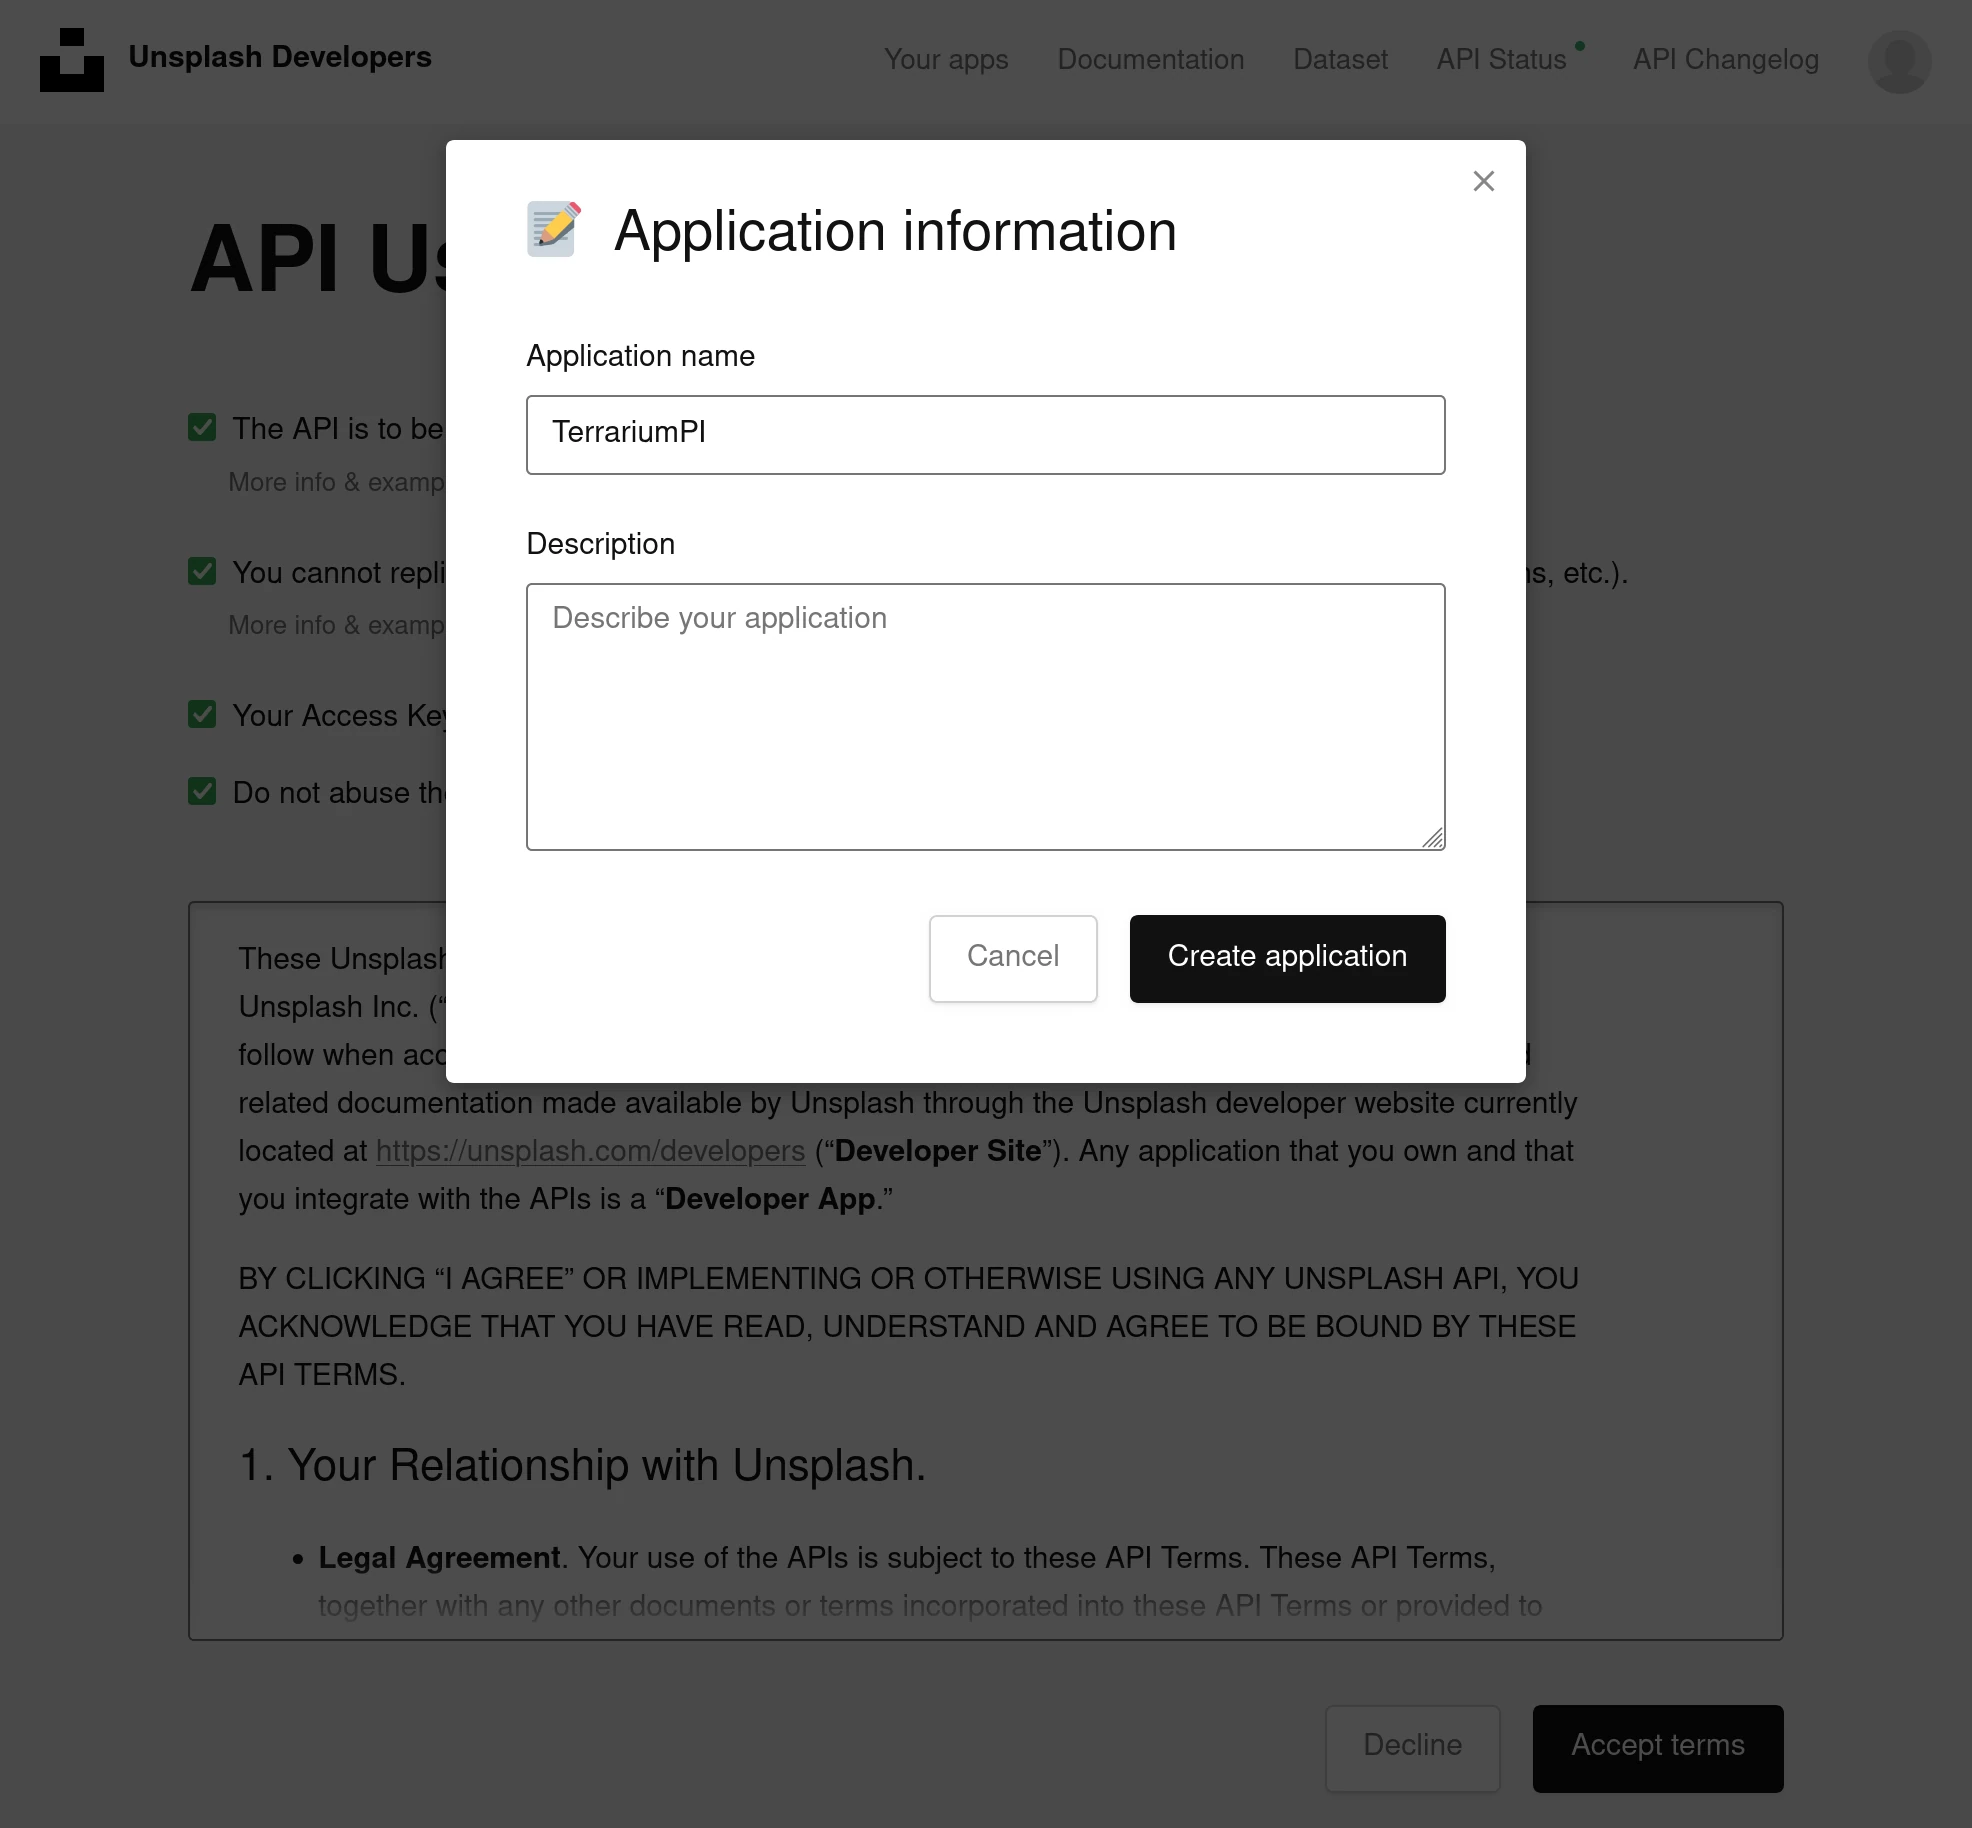
You will get a popup asking for the application name. Enter TerrariumPI. The description field is not needed.
On the next page you will see your created application. Scroll down to the section Keys.
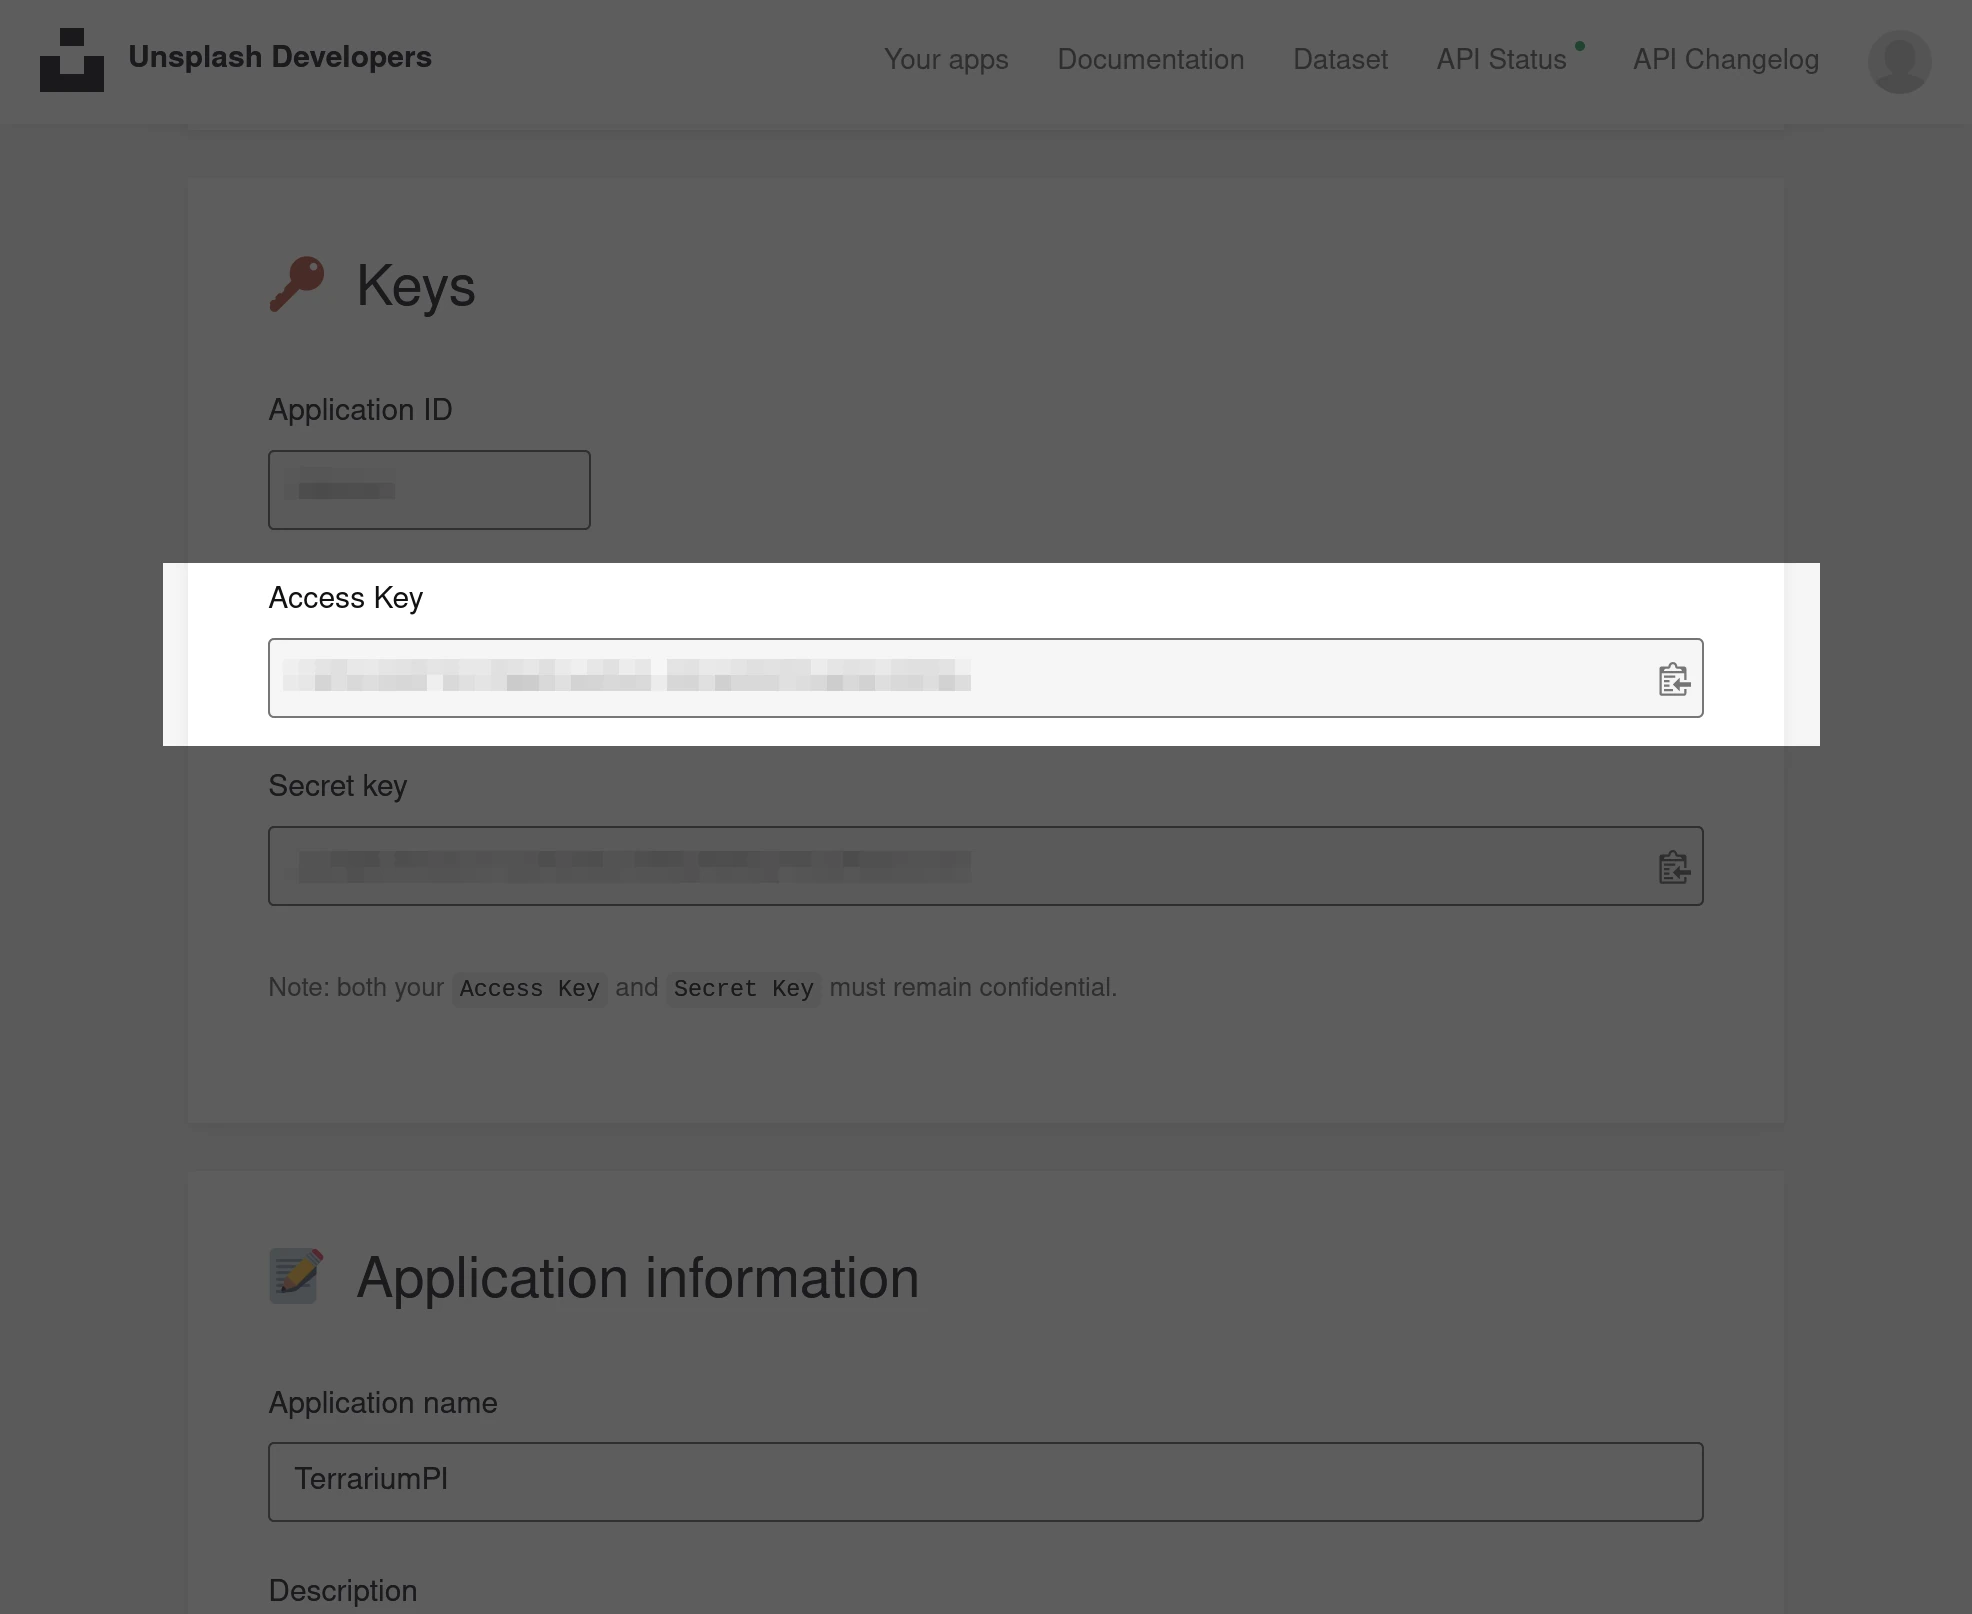
Copy the value of the Access Key field. This value is needed at the settings page.
Now go to your TerrariumPI settings page, and enter the Access Key value here at the Cloud part of the settings screen. The access will be stored encrypted in the database.
The second field at the settings page allows to specify the keyword(s) to use to get a new background image.
Now when the web GUI interface is loading, a random background image will be loaded.
-
The default login name is admin with password password. Make sure you change it after installation at the system setting page.
-
If you are running the software for a while, it is handy to backup some files in case of SD card corruption or any other reason that you have to reinstall the software. So here is a list of files that should be saved at a regular basis:
- data/* - Here is the database and calendar data stored
- media/* - Here are all the uploaded files like enclosure images or audio files stored
- webcam/archive/* (optional) - Here you can find all the archived images of the used webcams
- log/logging.custom.cfg (optional)
Warning
Due to the nature of TerrariumPI, the database can get corrupted during creating a backup. This is due the fact that at least every 30 seconds the database is updated. And that could case that the latest data is not backup-ed correctly. This can be fixed by using the database fix script. After fixing you will probably miss about the last 30 seconds till 30 minutes of data. Which is mostly sensor data.