Install

Here we will install Raspberry PI and TerrariumPI software step by step.
Raspberry PI
![]() In order to run TerrariumPI you first need a working Raspberry PI with the 32bit ‘Raspberry Pi OS Lite’ image. Make sure you are using the Lite version! This is very important as the Desktop version will not work well with the GPIO pins and Raspberry PI cameras.
In order to run TerrariumPI you first need a working Raspberry PI with the 32bit ‘Raspberry Pi OS Lite’ image. Make sure you are using the Lite version! This is very important as the Desktop version will not work well with the GPIO pins and Raspberry PI cameras.
TerrariumPI is tested on Raspbian OS Bookworm, Bullseye and Buster.
64bit is not supported due to missing mmal code which is needed for the webcams.
Creating SD Card
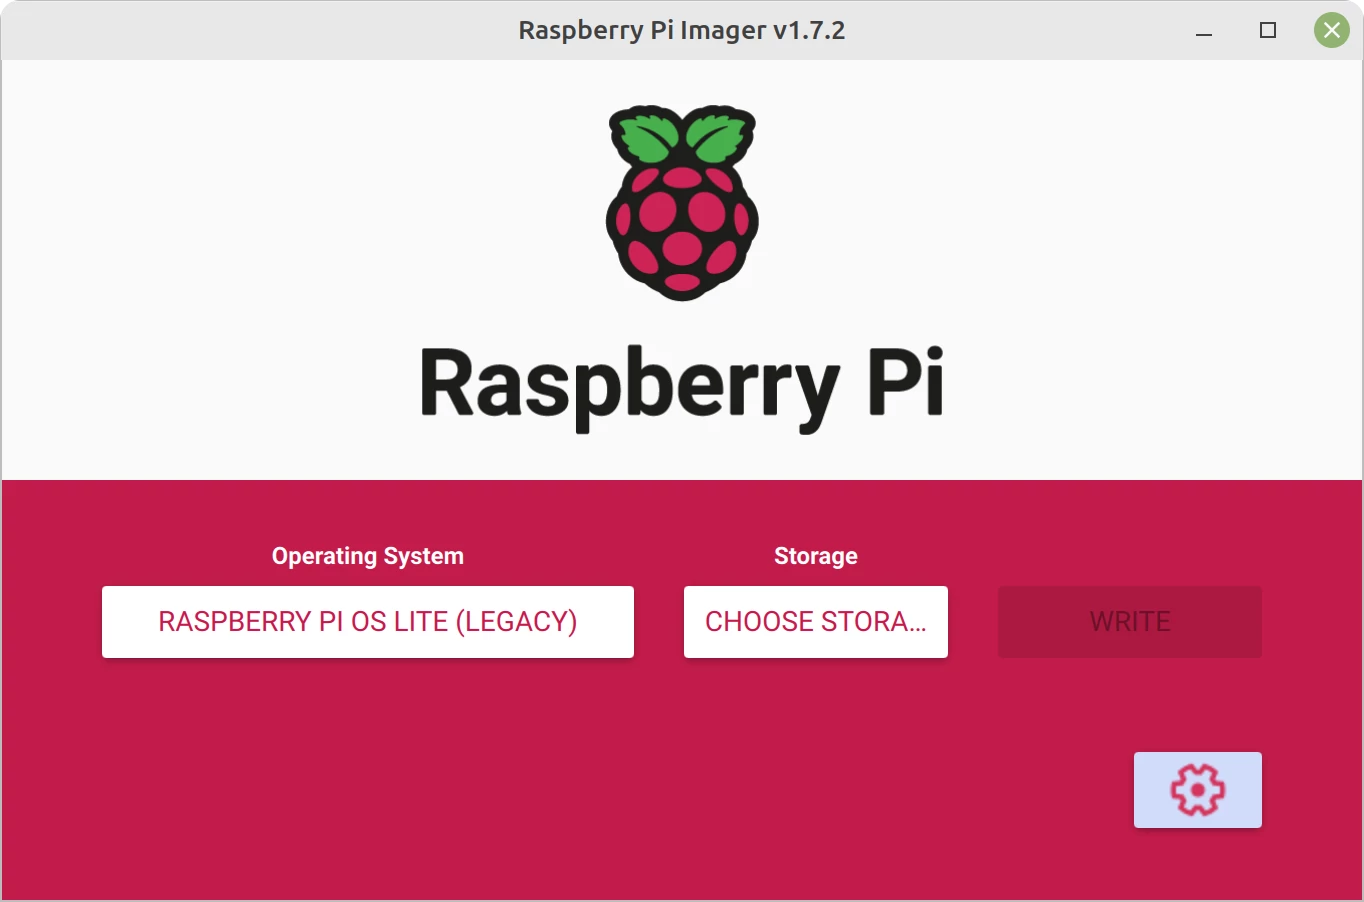 Download and instal the Raspberry Pi Imager to prepare your SD card. Make sure you have a SD card of at least 4GB of size. Bigger is better
 ![]() Make sure you select Raspberry Pi OS Lite from the other Raspberry Pi OS images.
Make sure you select Raspberry Pi OS Lite from the other Raspberry Pi OS images.
 In order to enable SSH, Wifi and other settings, click on the settings icon in the lower right corner. Here you enter your Wifi settings, pi password etc. Use this to install the Raspberry PI headless. Add the SD card in the Raspberry PI and withing a minute you should have a running Raspberry PI.
TerrariumPI
When the Raspberry PI is up and running, you should be able to SSH to it. On Linux and Mac you can use the terminal. For Windows, you can use Putty.
Use the username you have setup with the PI Imager tool. Mostly it will be pi , but if you have chosen a different username, than use that for the SSH connection. For TerrariumPI is does not matter what username you pick.
1

ssh [username]@[raspberrypi]
Disclaimer: If you have TerrariumPI running on the Raspberry PI, then you can read here how to stop and make a backup.
Docker
 As from version 4.1 there is a Docker image that can be used to run TerrariumPI. When you run it in Docker, you can skip the rest of the page. Only the migration could be followed if you want to restore your current relay history.
Versions
There are multiple docker images available. Make sure you are matching the docker image with your Raspberry PI host OS.
So if you have installed Bookworm OS on your Raspberry PI, make sure you use the :-bookworm container tag.
As of version 4.13.0 there is no
:latesttag anymore!
It was unadvisable to use the :latest tag. That was from the early days when there was just one container. And this was the very old Buster OS which is unsupported now.
Than there are also images with :-java in the tag name. Those images contains Java for Java related hardware.
Setup
Install docker according to: https://docs.docker.com/engine/install/debian/ Just follow the installation steps. And to run the docker commands as a normal user, follow these steps
Then you need to setup a docker-compose.yaml file. There is an example docker-compose.yaml.example in the contrib folder which can be used as a starting point:
1
2
3
4
5
6
7
8
9
10
11
12
13
14
15
16
17
18
19
20
21
22
23
24
25
26
27
28
29
30
31
32
33
34
35
36

services:
  terrariumpi:
    image: theyosh/terrariumpi:[X]-[OS]-[?Java]
    volumes:
      - /opt/terrariumpi/logs:/TerrariumPI/log
      - /opt/terrariumpi/data:/TerrariumPI/data
      - /opt/terrariumpi/media:/TerrariumPI/media
      - /opt/terrariumpi/scripts:/TerrariumPI/scripts
      - /opt/terrariumpi/webcam-archive:/TerrariumPI/webcam/archive
      - /opt/terrariumpi/DenkoviRelayCommandLineTool:/TerrariumPI/3rdparty/DenkoviRelayCommandLineTool # Only needed when using Java container

      - /boot/config.txt:/boot/config.txt # For OS Buster and Bullseye
      - /boot/cmdline.txt:/boot/cmdline.txt # For OS Buster and Bullseye

      - /boot/firmware/config.txt:/boot/firmware/config.txt # For OS Bookworm and Trixie
      - /boot/firmware/cmdline.txt:/boot/firmware/cmdline.txt # For OS Bookworm and Trixie
      - /run/udev:/run/udev # For OS Bookworm and Trixie

      - /etc/modules:/etc/modules
      - /dev:/dev
    network_mode: host
    restart: unless-stopped
    privileged: true
    cap_add:
      - NET_ADMIN
    stop_grace_period: 1m
    stop_signal: SIGINT
    init: true
    environment:
      TZ: 'Europe/Amsterdam' # timezone list can be found here https://en.wikipedia.org/wiki/List_of_tz_database_time_zones
      ENABLE_I2C: 'true'
      ENABLE_1_WIRE: 'true'
      ENABLE_CAMERA: 'true'
      ENABLE_SERIAL: 'true'
      ENABLE_CO2_SENSORS: 'true'
      AUTO_REBOOT: 'true'
Remark: Remove the lines which are not for your host OS.
The only real setting is the TZ value. Make sure it is set to your local/home time zone. A valid list can be found here.
We run the container with privileged enabled. This is less secure, but needed in order to be able to handle all the hardware that is connected to the Raspberry PI.
The network mode needs to be at host. Else bluetooth with not work, and you can’t use bluetooth sensors.
Then you can run docker compose up -d to start the docker image. It could be that it needs a reboot. After that, you should be able to access TerrariumPI on the url http://[raspberrypi]:8090. Continue with the setup
All docker images can be found at Docker Hub.
Manual
All the commands below needs to executed as normal user. This can be the default user pi or any other user you have created. This is imported due to security and manual debugging when there are problems.
Prerequisites
First we need to install Git. This is used to download the software from Github.com
1

sudo apt update && sudo apt -y install git
Download
After Git is installed, we can download the TerrariumPI source code. We will only download the latest version.
If you want to do some development or testing, omit the part --depth 1. Then you will get the full repository with all the branches.
1

git clone --branch main --depth 1 https://github.com/theyosh/TerrariumPI.git
Installation
And the final step is to start the installer. This will guide you through the installation process.
The first time you run the installer, it will also update the Raspberry PI OS to the latest version. This can take some more time.
Make sure you select the correct timezone. This is your home timezone. If you do not select the correct timezone during installation, you could get strange time schedules when running TerrariumPI.
1
2

cd TerrariumPI
sudo ./install.sh
After the installation is done, reboot once and you should be able to access TerrariumPI on the url http://[raspberrypi]:8090. Continue with the setup
Upgrading
Upgrading between minor versions is mostly running a few commands. Depending on a docker or manual installation, follow the steps below. After the upgrade is done, make sure you clear your browser cache. Else you can get the old interface or a broken interface.
Docker
We assume you are use docker compose and at the folder where the docker-compose.yaml file is.
- Stop the docker container:
docker compose stop - Change the version number in
docker-compose.yamland rundocker compose pull - Start the docker container:
docker compose up -d
And a new version should be running. A reboot is not needed.
Manual
We assume you are at the folder where TerrariumPI is installed with git.
- Stop TerrariumPI:
sudo service terrariumpi stop - Update the code:
git pull - Rerun the installer:
sudo ./install - Start TerrariumPI:
sudo service terrariumpi start
And a new version should be running. A reboot is not needed.
Migration from V3 to V4
There is no real migration from version 3 to version 4. The changes are to big. So that means you have to install TerrariumPI v4 as it was a new PI. These migrations steps will only copy the existing relay history data from V3 to V4 so that the total power and water usages is still there. And the total costs are still correct. This is all what will be migrated.
If you do not care about your relay history, you can just skip this migration. This is the only data that will be migrated!
Backup
So make sure you have stopped the old TerrariumPI. And rename the folder TerrariumPI to TerrariumPI.old. This way you have a backup of your existing working setup.
Stop TerrariumPI 3. Wiki
Make a backup of existing version.
mv /home/pi/TerrariumPI /home/pi/TerrariumPI.old
First setup
Now, install TerrariumPI v4 as described here. And then you need to set it up as you want. So that means adding at least all the relays you want to use/migrate. When that is done, shutdown TerrariumPI 4 and continue with the last migrations step.
Migrate
- First make sure you have an backup of files of the old V3 version:
- settings.cfg
- history.db
Stop the TerrariumPI service before start migrating.
sudo service terrariumpi stopEnter the new TerrariumPI V4 directory.
cd /home/pi/TerrariumPIEnter the Python3 virtual environment.
source venv/bin/activateEnter the
contribfolder where the filecopy_relay_history.pyis located.Run the script
copy_relay_history.pywith the following parameters in this order:
- full path to OLD config (
settings.cfg) - full path to OLD database (
history.db) - full path to NEW database (
terrariumpi.db)
- Answer the questions asked by the script. This should match your old and new relays, in order to copy the historical data.
1
2
3
4
5
6
7
8
9
10
11
12
13
14
15

Found 7 out of 8 are found. Below is a summary of the founded relays that can converted.

Relay 'Waterton verwarming' of type 'ftdi' at address '4,A500WMST'. Old ID: 7506c0e9ca0288be148b9617d959e7a6 => New ID: 91e8236ba878587c218b5a9a941a1d48
Relay 'Mister' of type 'eg-pm-lan' at address 'http://cvaVMnTiMYS35Be@192.168.5.150#2'. Old ID: 30f7595d5a055dc5b2a31127c93c9606 => New ID: 75588e78194b941b937b404db134422e
Relay 'Verwarmingmat' of type 'ftdi' at address '1,A500WMST'. Old ID: 137488ac23a2b0b516daa315641a178c => New ID: 477dd5dad0da139f8b48225acd3901d3
Relay 'UV Lamp' of type 'ftdi' at address '2,A500WMST'. Old ID: 4a2151d5834fe888820c831e9a6d8e8b => New ID: 97c45c98476b1807a4bfa7bb4d249b14
Relay 'Sproeier' of type 'ftdi' at address '3,A500WMST'. Old ID: 01ec0c8f3c4fd952c1b2aef8a4e9ec0d => New ID: beb111bdacda89f8bf13cc749ecd26c0
Relay 'Dripper plant' of type 'eg-pm-lan' at address 'http://cvaVMnTiMYS35Be@192.168.5.150#1'. Old ID: c867377cd5b6e1d4be580c1fa865ee82 => New ID: f53904eaedfac445e6cdae611612441f
Relay 'Heat lamp' of type 'nextevo-dimmer' at address '32'. Old ID: 574e22d2b2d6e54ecd5a3db8e6bb50b9 => New ID: 0e0cf978ca6bdb8eb994c186434a628e

The following relays could not be found:
Relay 'wemotest' of type 'wemo' at address '192.168.5.55'.

If you are happy with this setup, you can continue with the conversion. This will take a lot of time....
Enter 'yes' to continue. Anything else will abort.:
Enter yes and wait. After the migration is done, you will see a message and you can then start the TerrariumPI service. sudo service terrariumpi start